
Getting Around Guide
Introduction
Running and Energy
Restoring Energy
Teleport Spells
Lodestone Network
Fairy Ring Network
Teleportation Items
Spirit Tree Network
Transportation by Air
Transportation by Water
Carts
Summoning Familiars
Miscellaneous Methods
Credits
Introduction
In your many endeavours to explore and experience the wonders of the RuneScape world, you will have undoubtedly come across the problems of traversing great distances in the shortest possible time - to get to a party on time, your next clue location or to meet your friend like you promised. Read on to learn about the many ways of saving time, taking shortcuts and avoiding long walks in the wonderful scenery.
As you explore the world, you might want to use the Jagex world map which pops up in game by clicking the world picture next to your minimap, or alternatively utilise our own interactive world map when getting around. The transportation icons (arrows) on the maps quickly identify key locations.
Return to Top
Running and Energy
You have the option of choosing to walk or run from where you are to where you click to go next. Running is twice as fast as walking. To toggle between running and walking, click the run icon found next to the minimap.
It is also possible to run for a short time instead of running until your energy is consumed. Just hold CTRL when you click and you will run until you reach that spot. The next time you click, assuming you aren't still holding CTRL, you will be walking again.
However, the two factors of energy and weight will play a vital role when you consider whether to walk or run. When you walk, you do not lose energy. When you run, you lose energy. Energy recovers automatically back up to 100% when you are not running. There are several methods and many items that can help recharge energy.
Weight affects running because more weight will use up your energy faster. To check your weight, you need to open the equipment stats menu. The total weight carried is shown as in below image.

Wearing certain weight-reducing items can help to counter the effect of a heavy inventory, which will let your run energy last longer. However, note that reducing your weight below zero will make no difference. Note that all weight-reducing items are members only.
| Weight Reducing Items | |||
| Name | Picture | Effect | Requirements |
| Spotted cape | -2.5kg | 40 Hunter | |
| Boots of lightness | -4.5kg | None | |
| Spottier cape | -4.5kg | 66 Hunter | |
| Wicked cape | -6kg | 30 Runecrafting | |
| Penance gloves | -7kg | 40 Defence | |
| Wicked legs | -8kg | 55 Runecrafting | |
| Agile legs | -10kg | 85 Agility | |
| Wicked robe top | -10kg | 80 Runecrafting | |
| Agile top | -12kg | 90 Agility | |
Return to Top
Restoring Energy
You can recharge your run energy several different ways. The most common ways to recharge it are to allow it to restore naturally, using helpful items (see section below), and resting. When restoring energy naturally, the "auto-run" feature will enable you to begin running again automatically as soon as your recharge rate reaches 40%.
For members, the higher your Agility, the faster your energy will recover. Note that restoration advantages from agility do not carry over to free servers.
|
Resting allows you to restore your run energy (as well as your life points) at a faster rate than normal. The rate at which you recover energy during resting depends on your Agility level. You can rest anywhere in RuneScape by right clicking the run energy icon next to the minimap. While your character is resting, he or she will sit on the ground and the run icon will change into a person sitting down. |
| Look for the music icon |
|
| Musician Locations | |||
| Misthalin and Morytania (East) | Asgarnia and Islands (Centre) | Kandarin (West) | Wilderness |
|
|
|
|
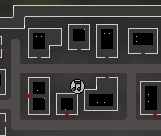
* In order to recharge by the unmarked musician in Pollnivneach, sit near Ali the Snake Charmer by the south door of the bar.
** Resting anywhere within taverley and Burthorpe will count as resting next to a musician.
If you're not one to sit around and take breaks, you can restore your run energy on the go by making use of various energy restoring items. These are listed in the table below:
| Energy Recharge Items | |||
| Item | Image | Restores | Source |
| Explorer's ring 1, 2, 3 or 4 | 50% | Lumbridge Tasks, 1 to 3 times a day per ring level | |
| Strange fruit | 60% | Pick from Strange plants that randomly grow on Karamja. Can also be obtained as a drop from the Chaos Elemental. | |
| White tree fruit | 16% | Varrock Castle Garden after Garden of Tranquillity quest | |
| Summer pie | 20% (also +5 Agility) | See Cooking Guide. | |
| Energy potion (4) | 20% | See Herblore guide. | |
| Super energy (4) | 40% | See Herblore guide. | |
| Gout tuber | 100% | Tai Bwo Wannai Cleanup minigame | |
| Mint cake | 100% | Gnome Delivery minigame | |
| Oo'glog Salt Water Pool | |
Maintains your run energy at 100% for 10-30 minutes | This pool is located in Oo'glog. Just jump into it! Requires As a First Resort... quest. |
| Unburden scroll | Based on agility level | Level 40 Summoning and Bull Ant familiar | |
| Tireless run scroll | Based on agility level (50% of level) (also +2 Agility) | Level 53 Summoning and Spirit Terrorbird familiar | |
| Winter sq'irkjuice | 10% | Sorceress's Garden minigame | |
| Spring sq'irkjuice | 20% | Sorceress's Garden minigame | |
| Autumn sq'irkjuice | 30% | Sorceress's Garden minigame | |
| Summer sq'irkjuice | 40% | Sorceress's Garden minigame | |
Return to Top
Teleport Spells
Besides running around on foot, players like to make use of other much faster methods of transportation. One such method is teleports, which allow you to teleport directly to major cities and locations all across the RuneScape world. As you increase your Magic level, you will gain access to more of these teleports. Note that spells in grey rows are members only. Refer to the magic guide for more details on these spells.
Standard Spellbook
| Teleportation Spells | ||||
| Pic | Level | Spell name | Location | Requirements |
| 10 | Mobilising Armies Teleport | Entrance to Mobilising Armies Command Centre | None | |
| 25 | Varrock Teleport*^ | City centre just south of the main statue and just north of the general store. Completion of the Easy Varrock Tasks allows you to modify your teleport to go to the South Entrance of the Grand Exchange on members worlds. | None | |
| 31 | Lumbridge Teleport*^ | Courtyard just outside Lumbridge castle | None | |
| 37 | Falador Teleport*^ | City centre just south of the statue and north of the Inn | None | |
| 40 | Teleport to House* | Your house portal | You must own a house in order to teleport to it! | |
| 45 | Camelot Teleport*^ | Outside the main gate of Camelot castle, east of Seers' Village. Completion of the Hard Seers' Village Tasks allows you to modify your teleport to go just outside the pub in Seers' Village. | None | |
| 51 | Ardougne Teleport*^ | Centre of the market between all the stalls | Completed the Plague City quest | |
| 58 | Watchtower Teleport*^ | Second floor of the watchtower just outside Yanille. Completion of the Hard Ardougne Tasks allows you to modify your teleport to go within Yanille's walls. | Completed the Watch Tower quest | |
| 61 | God wars dungeon Teleport | On top of the mountain | Completed the Eadgar's Ruse quest | |
| 61 | Trollheim Teleport | Past the rock in the snowy area. | Completed the Mighty Fall quest | |
| 64 | Ape Atoll teleport | Marim Temple on Ape Atoll | Completed the Awowogei part of the Recipe for Disaster quest. | |
* You can make teleport tablets corresponding to these spells. Refer to the Teleporation Items section for more information.
^ You can tie portals in your POH to these locations. For more information, refer to our Construction Guide for more information on the Portal Chamber.
There are three 'Teleother' spells which a player can cast on another to teleport them. This will only work if the target has his or her 'Accept aid' option on. The spells are shown below, but for more information refer to our Magic guide.
| Teleother Spells | |||
| Pic | Level | Spell name | Location |
| 74 | Teleother Lumbridge | Teleports Target to Lumbridge | |
| 82 | Teleother Falador | Teleports Target to Falador | |
| 90 | Teleother Camelot | Teleports Target to Camelot | |
Ancient Spellbook
If you have completed the members Desert Treasure quest then you will also have the ability to use the Ancient Magicks Teleports. These bring you to a variety of new locations, with particular teleports even sending you directly into the Wilderness.
| Ancient Magick Teleports (members only) | |||
| Pic | Lvl | Spell Name | Location |
| 54 | Paddewa Teleport | Edgeville Dungeon | |
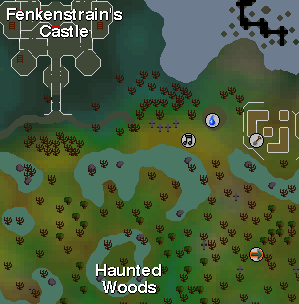
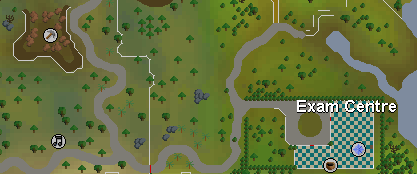
| 60 | Senntisten Teleport | Digsite Exam Centre | |
| 66 | Kharyrll Teleport^ | Canifis Pub | |
| 72 | Lassar Teleport | Ice Mountain | |
| 78 | Dareeyak Teleport | Level 23 Wilderness (Ruined Village) | |
| 84 | Carrallangar Teleport | Level 19 Wilderness (Graveyard of Shadows) | |
| 90 | Annakarl Teleport | Level 47 Wilderness (Demonic Ruins) | |
| 96 | Ghorrock Teleport | Level 45 Wilderness (Ice Plateau) | |
^ You can tie portals in your POH to these locations. For more information, refer to our Construction Guide for more information on the Portal Chamber.
Lunar Spellbook
If you have completed the members Lunar Diplomacy quest then you will also have the ability to use the Lunar Magicks Teleports. Besides offering a wide range of destinations, Lunar Magicks also offers telegroup spells, which allow you to teleport everyone standing within one space of you when you cast the spell. Like Teleother spells, those wishing to be teleported must have 'Accept aid' on, and will receive the option to be teleported to the location.
| Lunar Magick Teleports (members only) | |||
| Pic | Lvl | Spell Name | Location |
| 69 | Moonclan Teleport | Teleport to Moonclan Island bank | |
| 70 | Tele Group Moonclan | Teleport group to Moonclan Island bank | |
| 72 | South Falador Teleport * | Teleports you near the farming patch south of Falador | |
| 72 | Waterbirth Teleport | Teleport to Waterbirth Island | |
| 73 | Tele Group Waterbirth | Teleport group to Waterbirth Island | |
| 75 | Barbarian Teleport | Teleport to Barbarian Outpost | |
| 76 | North Ardougne Teleport * | Teleports you near the farming patch north of Ardougne | |
| 76 | Tele Group Barbarian | Teleport group to Barbarian Outpost | |
| 78 | Khazard Teleport | Teleport to Port Khazard | |
| 79 | Tele Group Khazard | Teleport group to Port Khazard | |
| 85 | Fishing Guild Teleport | Teleport to outside the Fishing Guild | |
| 86 | Tele Group Fishing Guild | Teleport group to outside the Fishing Guild | |
| 87 | Catherby Teleport | Teleport to Catherby | |
| 88 | Tele Group Catherby | Teleport group to Catherby | |
| 89 | Ice Plateau Teleport | Teleport to Ice Plateau (level 50 wilderness, west of agility course) | |
| 90 | Tele Group Ice Plateau | Teleport group to Ice Plateau (level 50 wilderness, west of agility course) | |
| 92 | Teleport to Trollheim * | Teleport to the farming patch in Trollheim | |
| 93 | Group Teleport to Trollheim * | Teleport group to the farming patch in Trollheim | |
* Note: These spells are unlocked as rewards from the Livid Farm Minigame.
Finally, regardless of which spellbook you are currently using, you will have access to the all encompassing Home Teleport spell. This spell allows you to teleport to various lodestones in the world, spread across a diverse range of locations. Unlike other teleport spells, it requires no runes and no experience is gained from it. Additionally, this teleport spell takes time to cast, so is not suitable for combat situations as, if you get interrupted, the spell will fail. You can however use vis wax for quick teleports which will immediately teleport you and skip the usual animation for home teleportation, each vis wax provides 10 quick teleports. You can cast this spell as often as you like. Refer to the next section for more information on the Lodestone Network.
| Home Teleport | |||
| Pic | Lvl | Spell Name | Location |
| 0 | Home Teleport | Various lodestones across the world | |
Return to Top
Lodestone Network
Spread across the world are ancient teleportation beacons known as lodestones. When you cast your Home Teleport spell, you will be presented with a map of the world and icons representing the lodestones you have unlocked. Selecting any of these icons will teleport you to the respective lodestone with your Home Teleport spell. Right-clicking your Home Teleport spell will give you the option to automatically direct your Home Teleport spell to the last lodestone you travelled to, bypassing this interface entirely.
However, not all of the lodestones can be teleported to immediately; some are inactive, and will need to first be activated before you can teleport to them via the Home Teleport spell. This be can done by travelling to the lodestone and activating it, after which its corresponding icon on your Home Teleport interface will be unlocked. Lodestones in grey rows can only be unlocked by members.
The various lodestones are described in detail in the table below:
| Lodestone Network | |||
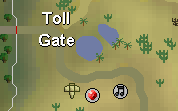
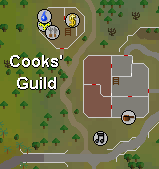
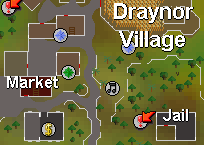
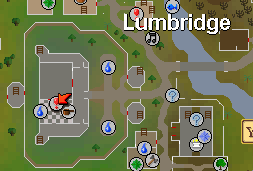
| Icon | Name | Lodestone Location | Location Map |
| Lumbridge | Just north-west of Lumbridge Castle (unlocked by default) | |
|
| Burthorpe | Outside Burthorpe Castle (unlocked by default) | |
|
| Bandit Camp | The six mirrors south-east of the Bandit Camp (unlocked by completing Desert Treasure) | |
|
| Lunar Isle | West of the bank on Lunar Isle (unlocked by completing Lunar Diplomacy) | |
|
| Al-Kharid | North of Al-Kharid Palace | |
|
| Varrock | South gate of Varrock | |
|
| Draynor | Crossroads north of Draynor | |
|
| Edgeville | Outside Oziach's house | |
|
| Falador | Road north of Falador | |
|
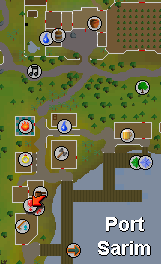
| Port Sarim | Outside the grocery store in Port Sarim | |
|
| Taverley | Opposite the Pick and Lute | |
|
| Catherby | Behind the Fishing Store | |
|
| Seers' Village | Outside the Forester's Arms | |
|
| Ardougne | North gate of Ardougne | |
|
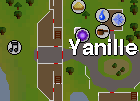
| Yanille | West gate of Yanille | |
|
| Canifis | North-east of Canifis | |
|
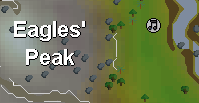
| Eagles' Peak | East of Eagles' Peak | |
|
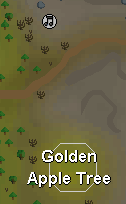
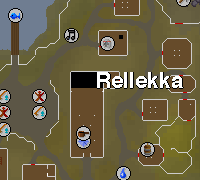
| Fremennik Province | East of Rellekka | |
|
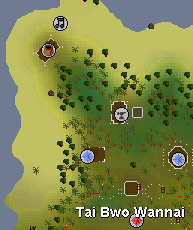
| Karamja | East of the Brimhaven dungeon entrance | |
|
| Oo'glog | North-west of Oo'glog | |
|
| Wilderness Volcano | South of the Wilderness Volcano (level 20 Wilderness) | |
|
| Tirannwn | North of the Poison Swamp | |
|
| Prifddinas | The centre of the Tower of Voices | |
|
| Ashdale | Centre of Ashdael (unlocked after completing A Shadow over Ashdale) | |
|
Return to Top
Fairy Ring Network (members only)
The Fairy Rings, accessed by starting the A Fairy Tale Part II - Cure a Queen quest, provide an extremely extensive network of travel. You must be wielding a dramen or Lunar staff to use any fairy ring, unless you have completed A Fairy Tale Part III - Battle at Orks Rift, which allows for use of the fairy rings without these items. All fairy rings outside of the Lost City of Zanaris will only take you back to Zanaris, where you can dial to teleport to another destination. Using the Zanaris fairy ring brings up three dials (like a combination lock) which you can click to change the destination of your teleport.
After you have traveled to a fairy ring, it will be added to the Travel log, which lists the codes you have already travelled to. When you click on an entry, it will automatically adjust the dials for you. When the combination is adjusted as desired, click the "Teleport to this location" words at the bottom.
Note that you cannot use the Fairy Ring network when you are teleblocked.
|
Click here to view the Fairy Ring Network Map Page |
The list of codes on the Fairy Ring Map PAge shows the useful destinations by roughly dividing the RuneScape map into three sections: West, Central, and East. These rough divisions are intended to help players plan their travel. The locations are listed from north to south for each area.
A few possible combinations and destinations take you to isolated or island locations with no monsters, nothing to do and nowhere else to go. Most unused combinations (not included in any of the tables) bring you back to Zanaris, within a few steps of the fairy ring.
Return to Top
Teleportation Items
Within the lands of RuneScape there are a number of items you can obtain during the course of your travels and adventures that will greatly assist you to get places in a hurry. These items, and the locations they can bring you to, are detailed in the table below. Members only items are denoted by a grey background.
| Teleportation Items | |||
| Name | Image | Destinations | Notes |
| Free to Play Items | |||
| Clan vexillum | The Clan Camp south of Falador. | Unlimited charges. | |
| Explorer's ring 3 or 4 | Teleports you to the Cabbage Patch south of Falador. | Unlimited charges. | |
| Ring of kinship | Daemonheim. | Unlimited charges. | |
| Runecrafting Guild tablets | Teleports you to outside the respective Runecrafting Altar. | Destroyed on use. | |
| Skull sceptre | Barbarian Village, south of Edgeville. | Has 5 teleport charges. Disintegrates when all charges are expended. | |
| Teleportation Jewellery | |||
| Amulet of glory | Edgeville, Karamja, Draynor Village or Al Kharid. | Has 4 teleport charges. Can be recharged at any time. | |
| Ring of wealth | Miscellania or the Grand Exchange. | Has 4 teleport charges. Can be recharged at any time. | |
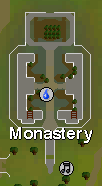
| Combat bracelet | Warriors' Guild, Champions' Guild, Monastery or Ranging Guild. | Has 4 teleport charges. Can be recharged at any time. | |
| Skills necklace | Fishing Guild, Mining Guild, Crafting Guild or Cooking Guild. | Has 4 teleport charges. Can be recharged at any time. | |
| Ring of life | Your chosen respawn point. | Activated automatically if your LP falls to between 0 to 10% of its maximum value. Destroyed on activation. | |
| Desert amulet 2, 3 and 4 | Nardah | Unlimited charges. | |
| Digsite pendant | The barge at the north end of the Digsite | Has 5 teleport charges. Disintegrates when all charges are expended. | |
| Ring of duelling | Duel Arena, Castle Wars lobby, Mobilising Armies Command Centre or Fist of Guthix lobby. | Has 8 teleport charges. Disintegrates when all charges are expended. | |
| Games necklace | Troll Invasion gatehouse at Burthorpe, Barbarian Outpost, or the Gamers' Grotto north of Falador. After completing the quest Tears of Guthix: Tears of Guthix (Juna) After completing the quest Summer's End: Corporeal Beast lair. After reaching a total level of 500 between your NPCs in Temple Trekking: Burgh de Rott |
Has 8 teleport charges. Disintegrates when all charges are expended. | |
| Ring of slaying | Sumona in Pollnivneach, Morytania Slayer Tower, Rellekka Slayer Caves, or Tarn's Lair | Has 8 teleport charges. Collapses into an Enchanted gem when all charges are expended. | |
| Ferocious ring | Kuradal in the Ancient cavern. Additionally functions as a ring of life in Kuradal's dungeon, teleporting you out to Kuradal when activated. | Has 5 teleport charges. Disintegrates when all charges are expended, or when its life-saving effect is activated. | |
| Camulet and Cramulet variants | Outside of Enakhra's Temple, north-east of the Granite Quarry. | Has 4 teleport charges. Can be recharged at any time. | |
| (Super) Dominion medallion | The Dominion Tower. | Has 3 teleport charges. Automatically recharged the next day. | |
| Drakan's medallion | The Barrows, Burgh de Rott, the Meiyerditch Myreque base, Darkmeyer or the Meiyerditch Laboratories. | Has 10 teleport charges. Charges are not expended when used in Morytania. Can be recharged at any time. | |
| Remora's Necklace | The White Knight Camp near Port Sarim. | Has 1 teleport charge. Automatically recharged the next day. | |
| Tokkul-Zo (Charged) | The Main Plaza, Fight Pits, Fight Caves and Fight Kiln in TzHaar City. | Unlimited charges. | |
| Other Items | |||
| Ardougne cloak 1, 2, 3 and 4 | The monastery south of Ardougne. Cloaks 2, 3 and 4: The farming patch north of Ardougne. |
Unlimited charges to the monastery. Cloaks 2 and 3: 1 charge per day to the farming patch. Cloak 4: Unlimited charges to the farming patch. |
|
| Bonesack (e) or Ram skull helm (e) | Limestone mine near the Odd Old Man's shack. | Has 1 teleport charge. Automatically recharged after one week. | |
| Broomstick | The Sorceress's Garden | Unlimited charges. | |
| Completionist cape | The monastery south of Ardougne or the farming patch north of Ardougne. | Unlimited charges. | |
| Ectophial | The Ectofuntus at Port Phasmatys. | Emptied on use. Can be recharged immediately after use. | |
| Elf teleport crystals | Lletya in Tirannwn. After completion of Within the Light: the Temple of Light. |
Has 3 teleport charges. Turns into a Tiny elf crystal when all charges are expended, which can then be recharged. | |
| Enchanted lyre | Rellekka. After completion of the Hard Fremennik Tasks: Option to change destination to Waterbirth Island. After completion of the Elite Fremennik Tasks: Option to change destination to Jatizso or Neitiznot. |
Can hold up to 6 charges. Turns into a Lyre when all charges are expended, which can then be recharged. | |
| Grand seed pod | When launched: The roof of the Grand Tree. When squashed: The King's room in the Grand Tree. |
Destroyed on use. | |
| Karamja gloves 3 or 4 | Gem mine beneath Shilo Village. | Unlimited charges. | |
| Locators | Various resource locations, based on locator type. | Has 50 teleport charges. Can be recharged at any time. | |
| Oldak's Marvellous Moving-over-distance Spheres | Dorgesh-Kaan, Goblin Village, Dungeon east of Fishing Guild or Bandos' Throne Room based on type of sphere (requires completion of Death to the Dorgeshuun, Another Slice of H.A.M., Land of the Goblins and The Chosen Commander to unlock all types of spheres). | Destroyed on use. | |
| Pharaoh's sceptre | Jalsavrah (Pyramid Plunder minigame Pyramid), Jaleustrophos (Agility Pyramid) or Jaldraocht (Ancient Magicks Pyramid). | Has 3 teleport charges. Can be recharged once all charges are expended. | |
| Sceptre of the gods | Jalsavrah (Pyramid Plunder minigame Pyramid), Jaleustrophos (Agility Pyramid) or Jaldraocht (Ancient Magicks Pyramid). | Has 10 teleport charges. Can be recharged once all charges are expended. | |
| Rum | Trouble Brewing minigame on Mos Le'Harmless. | Consumed on use. | |
| Teleportation Scrolls | Bandit Camp, Lumber Yard, Miscellania, Pollnivneach, the Phoenix Lair or Tai Bwo Wannai, based on type of scroll. | Destroyed on use. | |
| Teleportation Tablets | Ardounge, Camelot, Falador, Lumbridge, Varrock, the Watchtower or your House, based on type of tablet. | Destroyed on use. | |
| Teleportation Tablets (chipped) | House portals at Brimhaven, Pollnivneach, Rellekka, Rimmington, Taverley or Yanille, or Trollheim, based on type of tablet. | Destroyed on use. | |
| Wicked hood | Various Runecrafting Altars, dependent on talismans consumed by the hood. | Has 2 teleport charges in total. Automatically recharged the next day. | |
| Witchdoctor mask | The Herblore Habitat. | Unlimited charges. | |
Return to Top
Spirit Tree Network (members only)
Once you have completed the members Tree Gnome Village quest, you can use the various Spirit Trees dotted around the world to aid you in your travels. Below are some of the locations of Spirit Trees:
- Tree Gnome Village (Ancient tree)
- Tree Gnome Stronghold (Ancient tree)
- North-east of Grand Exchange in Varrock
- Khazard Battlefield
- Mobilising Armies Command Centre
Spirit Trees generally have two forms, young and ancient. Young Spirit Trees can only be teleported to from ancient Spirit Trees, and will only teleport you to the Tree Gnome Village Spirit Tree, while ancient Spirit Trees can teleport you to any other Spirit Tree. Simply speak to a Tree to use the network.
After completing the Grand Tree quest, you will be able to use the Tree Gnome Stronghold Spirit Tree to teleport to other Spirit Trees.
Level 83 farmers have the option of growing a young spirit Tree at one of three patches: west of Draynor, south-east Etceteria, or north-east Brimhaven. You are only permitted to have one Spirit Tree planted at a time. After having finished The Prisoner of Glouphrie Quest, a second Spirit Tree can be planted if you also have 86 Farming.
If you have reconnected the dying Spirit tree to the Anima Mundi in The Path of Glouphrie quest you will be given a new option for Spirit Tree teleporting.
- Mountains east of the Poison Waste
Additionally, you will also gain the ability to teleport between any two trees, without having to make use of an ancient Tree.
Return to Top
Transportation by Air (members only)
Ingenious adventurers will be able to make use of various gravity-defying methods of transportation. This section covers these methods, which include gnome gliders, hot air balloons, eagles and magic carpets.
Gnome Glider Network
Once you have completed the Grand Tree quest, you can take advantage of the many Gnome glider locations to fly across RuneScape. Shown below is the map you see when you click on the Gnome pilot, with the translations shown as well. Gliders across the world will take you to the Grand Tree, and from that hub you will be able to fly to other gliders. Note that travelling to the Digsite location is one-way.
The glider option at the Feldip Hills is unlocked after completing the One Small Favour quest, and the glider option at the Tree Gnome Village is unlocked after completing the Prisoner of Glouphrie quest.
If you are doing or have completed the Monkey Madness quest, you can talk to Daero at Blurberry's Bar (in the Grand Tree) to be taken to the secret military glider hangar. From here, you can fly to Crash Island which is located east of Ape Atoll. You can talk to the gnome on Crash Island to take a boat trip to the Atoll. You can follow the process backwards to return.
Hot Air Balloon Network
After you have completed the An Enlightened Journey quest, you can sail high above the ground on each of the subsequent routes you help Auguste to unlock. Instructions and pictures to unlock each route are in the Balloon Routes guide.
To travel between two locations, each of them must have been unlocked (using the Balloon Routes guide). To travel to a particular place, you need to bring 1 log of the type you originally used to unlock it. Note that your weight must be less than 40kg.
| Hot Air Balloon Destinations | |||
| Destination | Log to burn | Firemaking Level | Nearby Features |
| Entrana | Normal logs | 20 | Herblore store, Hops farming patch, Crafting guide, Law Altar, entrance to Entrana dungeon with Dramen tree and portal to Level 32 wilderness |
| taverley | Normal logs | 20 | Tree farming patch and allotment patch, Herblore store, Summoning Store, Pet Store, Druids circle, entrance to Member's Dungeon, Taverley |
| Crafting Guild | Oak logs | 30 | Crafting Guild, Snape grass and Hobgoblins behind crafting guild, Makeover mage, Dark Wizards' Tower, Melzar's Maze and Rimmington to south, Falador |
| Varrock | Willow logs | 40 | Sawmill operator, Lumberyard, Earth runecrafting altar, Limestone mines to east, Varrock |
| Castle Wars | Yew logs | 50 | Castle Wars, Jiggig and Zogre coffins, Observatory |
| Grand Tree | Magic logs | 60 | Tree Gnome Stronghold, Gnome agility training area, tree and fruit tree farming patches, Grand Tree |
Note: The levels required to burn logs in the air is different than the levels required to burn them on the ground. Also, you gain no firemaking experience for the log used to travel via a Hot Air Balloon once you have unlocked a route.
Eagles
Intrepid hunters, once they have completed the Eagle’s Peak quest, have the opportunity to harness these noble birds of prey and ride them between four of the different hunting locations.
You may travel from the woodlands (south of the Piscatoris Fishing Colony) to the following three hunting locations – desert (north-west of Uzer), jungle (south of Feldip Hills) or snow (north-east of Rellekka). From these three locations you can only travel back to the woodlands, so if you wanted to travel from the heat of the desert hunting area to the chill of the snow hunting area, your route would have to be via the woodlands hunting area hub. Here you can disembark and catch a connecting flight to your desired destination.
When you have completed the Back to my Roots quest, you can also use the eagles to fly to the middle of the maze in the quest, which is located to the north-east of Shilo Village in the Karamjan jungle. For further details refer to our Hunter Guide.
Magic Carpet Network
Just south-east of Shantay Pass, and at various desert locations, the Rug Merchants run a network of Magic Carpet travel routes. Each trip is 200gp, or 100gp after doing the Rogue Trader minigame, and 75 gp if wearing the Ring of Charos(a). The fast travel option takes you to your destination immediately, at five times the standard cost. It's faster (and safer!) than running and connects to major locations in the Desert:
|
|
|
Return to Top
Transportation by Water
Vast expanses of water cover the world of RuneScape, be they small streams or the magnificent ocean. This section covers the methods you can use to get around these bodies of water, including basic seacrafts, chartered ships and canoes.
Basic Seacrafts
There are many locations across the world where you can take small ships, simple boats and the like to travel to and from various locations. This section covers these basic routes you can take in your travels.
The journeys you can take on ships are listed in the table below. Each of these journeys can be taken in reverse, unless noted by a star.
| Basic Routes | ||
| From | To | Notes and Requirements |
| Port Sarim | Musa Point | Costs 30gp. Reduced to 15gp after completion of Easy Karamja Tasks. Free if wearing Ring of Charos(a). |
| Port Sarim | Entrana | You must have no weapons or armour in order to board. |
| Daemonheim | Al Kharid or Taverley | From Daemonheim, you can take this ship to either Al Kharid or Taverley. |
| Ardougne | Brimhaven | Costs 30gp. Reduced to 15gp after completion of Easy Karamja Tasks. Free if wearing Ring of Charos(a). |
| West of Shilo Village* | Port Sarim or Port Khazard | Costs 32 to 50gp. Alternatively, you can buy a Ship ticket in Shilo Village for 25gp to pay for this trip. |
| Rellekka | Waterbirth Island | None |
| Rellekka | Miscellania | Completed the Fremennik Trials. |
| Rellekka | Lunar Isle | Started Lunar Diplomacy. |
| Rellekka | Neitiznot or Jatizso | Started The Fremennik Isles. |
| Beach north-east of Rellekka | Penguin Iceberg | Started Cold War. |
| Polar Hunter Area | West of Ghorrock Fortress | Partially completed The Tale of the Muspah. |
| East of Rantz's home* | West of Tai Bwo Wannai | Completed Recipe for Disaster - Ogre subquest. Costs 2 Cooked chompies. |
| West of Tai Bwo Wannai* | East of Rantz's home | Completed Recipe for Disaster - Ogre subquest. Costs 2 Clean snake weed. |
| West of the Gnome Stronghold (outside) | Piscatoris Fishing Colony | Costs 50gp. Free after starting the Swan Song quest or if wearing the Ring of Charos(a). |
| Port Phasmatys | Mos Le' Harmless | Completed Cabin Fever. |
| Port Phasmatys | Dragontooth Island | 25 ectotokens, or 10 if wearing the Ring of Charos(a). Return journey is free. |
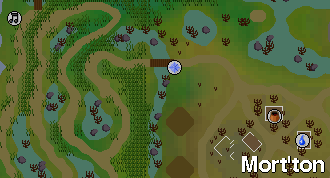
| The Hollows | Mort'ton | Completed In Search of the Myreque. Return journey costs 10gp. |
Chartered Ships (members only)
Besides the basic seafaring crafts listed above, it is also possible to charter ships to sail from port to port. Trader Stan has made his fleet of ships available for private charter around the world of RuneScape. These form an extensive network covering a wide range of locations, but on the flipside are more expensive to use. To charter a ship, simply speak to Trader Stan or any one of his sailors at the ports shown.
Some ports will not be shown on your map until you complete a related quest. These are marked with an asterisk * in the tables below.
Chartered locations with quest requirements:
- Mos Le' Harmless - Cabin Fever quest
- Oo'glog - As A First Resort ... quest
- Port Tyras - started Regicide quest
The prices for chartering a ship are shown in the tables below. The first table shows the base prices.
If you are wearing the ring of Charos(a) when you book a charter, these prices will be halved.
Players who have completed the Cabin Fever quest are deemed to be experienced sailors. The price they pay to charter a ship will be also be less. (Wearing a ring of Charos(a) will further reduce this charge).
| Chartering Ships - Base Prices | |||||||||
| From / To | Brimhaven | Catherby | Karamja | Oo'glog* | Port Khazard | Port Phasmatys | Port Sarim | Port Tyras* | Shipyard |
| Brimhaven | N/A | 480 | 480 | 3800 | 400 | 2900 | 1600 | 3200 | 400 |
| Catherby | 480 | N/A | 480 | 3400 | 1600 | 3500 | 1000 | 3200 | 1600 |
| Karamja | 200 | 480 | N/A | 2000 | 400 | 1100 | Other Ship | 3200 | 200 |
| Oo'glog* | 3800 | 3400 | 2000 | N/A | 5000 | 2800 | 1400 | 3200 | 900 |
| Port Khazard | 1600 | 1600 | 1600 | 5000 | N/A | 4100 | 1280 | 3200 | 1600 |
| Port Phasmatys | 2900 | 2500 | 1100 | 2800 | 4100 | N/A | 1300 | 3200 | 5200 |
| Port Sarim | 1600 | 1000 | Other Ship | 1400 | 1280 | 1300 | N/A | 3200 | 400 |
| Port Tyras* | 3200 | 3200 | 3200 | 3200 | 3200 | 3200 | 3200 | N/A | 3200 |
| Shipyard | 400 | 1600 | 200 | 900 | 720 | 1100 | 400 | 3200 | N/A |
Players who have completed the Cabin Fever quest OR are wearing a ring of Charos(a) will be charged half the above prices. Players who have completed the Cabin Fever quest will also see a new destination on their map - Mos Le' Harmless.
You can sail for free between Port Phasmatys and Mos Le' Harmless, using Bill Teach's ship.
| Chartering Ships - Experienced Sailors OR Ring of Charos(a) | ||||||||||
| From / To | Brimhaven | Catherby | Karamja | Mos Le' Harmless * | Oo'glog* | Port Khazard | Port Phasmatys | Port Sarim | Port Tyras* | Shipyard |
| Brimhaven | N/A | 240 | 240 | 1950 | 1900 | 200 | 1450 | 800 | 1600 | 200 |
| Catherby | 240 | N/A | 240 | 1750 | 1700 | 800 | 1750 | 500 | 1600 | 800 |
| Karamja | 100 | 240 | N/A | 550 | 1000 | 200 | 550 | Other Ship | 1600 | 100 |
| Mos Le' Harmless* | 1450 | 1250 | 2050 | N/A | 550 | 550 | Other Ship | 650 | 1600 | 550 |
| Oo'glog* | 1900 | 1700 | 1000 | 550 | N/A | 2500 | 1400 | 700 | 1600 | 450 |
| Port Khazard | 800 | 800 | 800 | 2050 | 2500 | N/A | 2050 | 640 | 1600 | 800 |
| Port Phasmatys | 1470 | 1250 | 550 | Other Ship | 1400 | 2050 | N/A | 650 | 1600 | 2600 |
| Port Sarim | 800 | 500 | Other Ship | 650 | 700 | 640 | 650 | N/A | 1600 | 200 |
| Port Tyras* | 1600 | 1600 | 1600 | 1600 | 1600 | 1600 | 1600 | 1600 | N/A | 1600 |
| Shipyard | 200 | 800 | 100 | 550 | 450 | 360 | 550 | 200 | 1600 | N/A |
Players who have completed BOTH the Cabin Fever quest AND are wearing a ring of Charos(a) will be charged the lowest rate of all. (This is half of the above rates, which works out to be a quarter of the base prices).
| Chartering Ships - Experienced Sailors wearing a Ring of Charos(a) | ||||||||||
| From / To | Brimhaven | Catherby | Karamja | Mos Le' Harmless* | Oo'glog* | Port Khazard | Port Phasmatys | Port Sarim | Port Tyras* | Shipyard |
| Brimhaven | N/A | 120 | 120 | 975 | 950 | 100 | 725 | 400 | 800 | 100 |
| Catherby | 120 | N/A | 120 | 875 | 850 | 400 | 875 | 250 | 800 | 400 |
| Karamja | 50 | 120 | N/A | 275 | 500 | 100 | 270 | Other Ship | 800 | 50 |
| Mos Le' Harmless* | 725 | 625 | 1025 | N/A | 275 | 275 | Other Ship | 325 | 800 | 275 |
| Oo'glog* | 950 | 850 | 500 | 275 | N/A | 1125 | 700 | 350 | 800 | 225 |
| Port Khazard | 400 | 400 | 400 | 1025 | 1250 | N/A | 1025 | 320 | 800 | 400 |
| Port Phasmatys | 735 | 625 | 275 | Other Ship | 700 | 1025 | N/A | 325 | 800 | 1300 |
| Port Sarim | 400 | 250 | Other Ship | 325 | 350 | 320 | 325 | N/A | 800 | 100 |
| Port Tyras* | 800 | 800 | 800 | 800 | 800 | 800 | 800 | 800 | N/A | 800 |
| Shipyard | 100 | 400 | 50 | 275 | 225 | 180 | 275 | 100 | 800 | N/A |
Canoes
Players can build canoes and use them to travel them up and down the River Lum, which runs from the wilderness to Lumbridge. You can make four different types of canoes based on your woodcutting level. A canoe can be used to travel to other canoe stations along the River Lum, with better canoes able to cover a greater distance before sinking.
To make a canoe chop down the "canoe tree" at any station. Click to shape the canoe and choose your design. Once you have made your canoe you can decide which station you want to go to. Note that there is no canoe tree in the wilderness, and hence the wilderness is an arrival destination only. The canoe stations, from north to south, are listed below:
- The Wilderness, south-east of the Lava Maze (level 35)
- Edgeville
- Barbarian Village
- Champion's Guild
- Lumbridge
| Canoes | |||
| Pic | Woodcutting Level | Canoe Type | Distance |
|
12 | Log | 1 station |
| 27 | Dugout | 2 stations | |
| 42 | Stable Dugout | 3 stations | |
| 57 | Waka | 4 stations | |
Note: only the Waka canoe can travel to the wilderness.
Return to Top
Carts (members only)
Keldagrim Steam-powered Cart Network
Members who have completed the Giant Dwarf quest unlock the underground city of Keldagrim, and can begin making use of a new method of transportation: Dwarven mining carts! This method of getting around is completely free to you! From the central "hub" of Keldagrim, you can travel to the following locations:
|
|
Dorgesh-Kaan - Keldagrim Subway Train
| Members who complete the Another Slice of H.A.M. quest get free rides on the subway between the underground cities of Keldagrim and Dorgesh-Kaan. The Keldagrim station entrance is south of the Blast Furnace, while the Dorgesh-Kaan station entrance is in the south-west corner of the city's middle level. | |
Shilo Hand-drawn Jungle Cart
| Vigroy has a cart in Shilo Village, and can cart you up to Brimhaven (by the dock) for 10gp. Hajedy at the other end also has a cart and is willing to take you on a journey in the opposite direction, also for 10 gp. Of course, you will need to have completed the Shilo Village quest to use this cart route. | |
Return to Top
Summoning Familiars
The Summoning skill can lend in hand in your travels, allowing you to summon familiars which offer unique teleports. These familiars and details of their teleports are listed below.
| Familiars | ||
| Summoning Level | Familiar | Abilities |
| 34 | Void Ravager | Scroll can teleport you to Pest Control Landers |
| 34 | Void Shifter | Scroll can teleport you to Pest Control Landers. Also acts like a ring of life, instead teleporting you to the Void Knight outpost. |
| 34 | Void Spinner | Scroll can teleport you to Pest Control Landers |
| 34 | Void Torcher | Scroll can teleport you to Pest Control Landers |
| 57 | Spirit Graahk | Can teleport you to Horned Graahk (Karamja) hunting area |
| 57 | Spirit Kyatt | Can teleport you to the hunting area south of the Piscatoris fishing colony |
| 57 | Spirit Larupia | Can teleport you to Feldip Hills hunting area |
| 71 | Arctic Bear | Can teleport you to the Polar Hunting area |
| 83 | Lava Titan | Can teleport you to the Lava Maze |
Return to Top
Miscellaneous Methods
There are other little ways of sneaking around and taking short cuts, listed and described below.
The Abyss
The Abyss is located in another plane and only accessible to members through the Zamorakian Mage north-east of Edgeville. For detailed information, see our map and commentary about it. Once inside, you can choose which rift to exit through to end up at any of the Runecrafting altars. Read our Runecrafting guide on the advantages and disadvantages of this mode of transport.
Ardougne-Wilderness teleport
In the west of the main city of Ardougne, west of King Lathas' castle and in front of the large walls of West Ardougne, there is a small hut with a lever. Pulling this lever will teleport you to another hut in level 54 wilderness. You will need a knife or a weapon to escape from the Deserted Keep in the wilderness. This is widely used by members going training or adventuring in the wilderness. You can also pull the opposite lever in the wilderness to teleport to the hut in Ardougne, but this will not work if you have been teleblocked.
Edgeville-Wilderness-Ardougne teleport
Another teleport lever is located inside the ruined building south of Edgeville bank. You will be returned to Ardougne from the Deserted Keep. This can be used as a quick way from Edgeville to Ardougne. You cannot return to Edgeville from Ardougne or the Deserted Keep.
Dark Wizard teleport
This is a free teleport from the Dark Wizards' Tower (west of Falador, north of Makeover Mage and Crafting Guild) to Lumbridge Swamp. Go to the top floor of the Dark Wizards' Tower and talk to Zandar Horfyre. He tries to get you to leave. If you refuse, he teleports you to Lumbridge Swamp, very close to the Lost City entrance shed (west of the swamp mine, north of water rune altar).
Harmony Island
If you have started the Great Brain Robbery quest, you can be speak to Brother Tranquility on Mos Le' Harmless to teleport to Harmony Island.
Magic Guild portals
On the second floor of the Mage's guild in Yanille there are three portals that will teleport you to different wizard-related locations.
- The east portal teleports you to the Wizards' Tower south of Draynor Village.
- The south portal teleports you to the Dark Wizards' Tower just north of the Crafting guild.
- The west portal teleports you to Thormac the Sorcerer's house just south-west of the Seers' Village and Catherby.
Mort Myre Swamp
Once you have completed the In Search of the Myreque quest, you will be able to use the trap door behind the Canifis Inn to enter the Myreque Dungeon. If you search the wall, and exit through the big doors on the opposite end, you will be able to enter the Hollows in Mort Myre Swamp.
Shantay Jail teleport
You can essentially teleport from the Shantay Pass to Port Sarim. Talk to Shantay and tell him you are an outlaw and 'Prepare to Die!' He will put you in the jail next to him and ask you to pay 5 gp to leave. Keep on refusing and you will be taken to the 'high security' prison at Port Sarim. There you can simply "pick" the lock (thieving not required), walk out and go your merry way. This method works on both f2p and p2p.
Wilderness Teleport Portals
In the Wilderness there are six portals that will randomly teleport you to one of the other portals located in the Wilderness. To activate a portal touch one of the four pillars, then stand in the centre. The portals will not work if you've been teleblocked. Note: the portals will teleport everyone in the area. Also you may get teleported deeper into the Wilderness. The six locations are marked as glowing blue portals on Tip.It's Wilderness Map:
- South-east of the Rogues' Castle (level 50)
- West of the Lava Maze (level 45)
- South of the Lava Maze at Green Dragons (level 36)
- North of the Wilderness Bandit Camp (level 27)
- South of Graveyard of Shadows (level 18)
- South of the Wilderness volcano (level 14)
Artefact
The Artefact is a method of getting to the King Black Dragon which does not require running through the Wilderness. Found north of the Monastery in Edgeville, simply click on the Artefact to active it. It will then teleport you into the lair itself. You can also find another Artefact inside of the lair next to where you teleport in, should you wish to leave the lair that way. Note: A combat level of at least 100 is recomended, along with some form of antifire, as the KBD can attack you as soon as you enter.
Botany Bay Teleport
To get to the Botany Bay, you will need to talk to the Trial Announcer, who can be found in Ardougne marketplace, Falador East bank, Edgeville, The Grand Exchange and Varrock East bank. He can teleport you directly to the Bay itself, and is the only way of getting to the Bay.
Dying
When you die in RuneScape, you will be able to choose your respawn point (the choice consists of the last three "hubs" (or city areas) you visited. If you die in the wilderness, your respawn point will be Edgeville by default. For more information on RuneScape Death, refer to the Death section in our Beginner's Guide.
Return to Top
Credits
Original Guide by: Eeeeediot
Revised version by: Saradomin_Mage
Special Thanks to: Jaffy1
Thanks to: abomb67, Adamskii, ah_sam1, Akoolb, All Bogs, anishka0, Annialator10, asgeorge, AtomicBoss, Aurhora, bambino, bbeetuna, bbillfan92, Beethovens29, bluehooloovo, Brainymidget, brunokiller, Cameron, Cowman_133, creepybacon, Crisis Star, d4rk inferno, Dalcyte, dogfever, dsavi_x4, ebenezum1, Empror1, Flippi273, fox369, Fudgy666, Gandorf61, GeorgeLemmons, gnat, Grasle, Headnazgul, Howlin1, Huge Brain, i have fun, ikkevincent, inferno_char, Jaffy1, jaklumen, Jarwing, jimmyw3000, Juhniz, KArthur90, kayoszee, Kaphias, Kiara_Kat, killer_bowey, knittinqueen, krogiecom, Lady_Shahdie, Laikrob, LordBaer, Lorexvath, Mc90123, Mchainmail, mik0082, Mil, Mirrorforced, misplacedme, Nightgunner, nothnxtoyou, obnox6, oddfaery2, Personcowcow, Pinkbullet3, Pker_Dude_Jr, pmthecat, pokemama, Raven6666, retrac1324, Rien_Adelric, SaidinWoT, Sandorsandor, Saradomin_Mage, SATANsSTI, SerpentEye, Shasta_Sms, Shelby_Polo, Silver Eros, sirlonewolf, sjefderat, smellysocks, Speedyshel, SportsGuy, sunmann99, supa_newb, Tecbro532, TheEaglez, thezara, the49ronin, tigerboy788, Tuturuturu, twiggy_6692, tryto, Uksparhawk, Ultrninja, Umega, Vap137, vlad the old, Vox1st, Vulxai, Wachtwoord, Warriormonkx, Weodwn, weirdguy0101, Wisetsm, wyvren2000, XxTearGodxX
Last Updated by: Howlin0001
Last Updated on: 09-Nov-2014
| RuneScape 2007 |
| Find this page on the Internet Archive with a date as close to Aug 10, 2007 as possible. |

Add a Tip.It button to your web site:
© 1999 - 2024 RuneScape Tips, all rights reserved.
RuneScape® and Jagex® are trademarks of Jagex Ltd © 2000 - 2024 Andrew Gower.
Reproducing or copying any material found on this page is not allowed. Designed for IE8+, Firefox 3.5+, Safari 4+, Opera 10+, and Chrome by Mil.