
Elemental Workshop III
Start location: Search the bookcase found in the Seers' Village Chapel and read the Ragged book found there.
Requirements:
Quests: Elemental Workshop II
Skills: Level 33 Defence, Level 20 Mining, Level 33 Smithing
Items: Slashed book, Battered key, Pickaxe, Hammer, Soft clay, 12 Coal
Suggested:
Level 66 Defence or a Restore potion (4).Monsters: Earth elemental
Walkthrough hide »
| Start | |
| Required Items | Battered key, Pickaxe, Hammer, Soft clay, 12 Coal |
| Recommended Items | - |
1. Search the bookcase found in the Seers' Village Chapel and collect the Ragged book. Use a soft clay on the book to obtain a Key mould, and then head to the Elemental Workshop when you're ready.
Note: If you do not have your slashed book and battered key, you can obtain them from the bookshelf in the house across from the entrance to the Elemental Workshop.
Whilst in the workshop you can use this map page to help you navigate.
2. Enter the Elemental Workshop in the building west of Seers' Village bank (you'll need a Battered key to do so). Once you've gone in, obtain three Elemental ores by mining elemental rocks and defeating the Earth elementals that spawn. Use these along with 12 Coal in the furnace to the south to smelt three elemental bars. Use one bar with the furnace, with the mould in your inventory, to create a ragged elemental key. Keep the remaining bars for later.

3. Climb down the central staircase to the floor below and use them to create two primed bars as was done in the Elemental Workshop II quest.
- Place the bar on the jig cart which should be positioned at the southernmost station.
- Pull the west lever twice, then use the east lever to position the bar over the lava. Use the west lever twice to dip the bar in lava, then the east lever to reposition the bar over the jig cart. Drop the bar with the west lever. Operate the jig cart lever and move to the next station.
- Pull the lever at the pressing station. Operate the jig cart lever and move to the next station.
- Pull the lever to open the door to the cooling tank. Use the corkscrew twice to put the cart inside the tank. Pull the lever to close the door.
- Turn on the west water valve, then turn it off when the tank is filled. Open the east valve to drain the tank, then close it when it has emptied.
- Pull the lever to open the door and use the corkscrew twice to return the jig cart to the track. Pull the lever to close the door. Operate the jig cart lever and move to the next station.
- Pull the lever at the fanning station, then pull it again to stop the fan. Operate the jig cart lever and move to the next station to claim your bar.
Repeat this process for a second primed bar. For additional information on how to create the Primed bars, please refer to Steps 10-13 of the EW II quest guide.
| In the Puzzle Room | |
| Required Items | Ragged elemental key, 2 Primed bars |
| Recommended Items | - |
4. With the key and bars in hand, climb down the staircase and walk south to the Body Door. Unlock it with the ragged elemental key before continuing on through to the large room beyond.
5. West of the Body Door, there is a locked Control Room with a slot on the outside of the door; simply insert one of your Primed bars into the slot to unlock the door and gain access to the Control Room. You won't need to use this room yet, so climb down the nearby stairs afterwards.
The area below contains a colossal and complex machine, not entirely unlike the one found during the Elemental Workshop II quest. The machine itself acts as a sliding-panel puzzle (similar to Treasure Trails Puzzles), and you'll be required to manipulate its components in order to have the machine create Body bars for you.
Concerning the machine, there are several features of interest:
- Turn Counter - Located west of the puzzle, this counts back from 50 each turn you make and it will forcibly reset your progress if you exceed 50 turns before resetting.
- Reset Lever - Located in front of the turn counter. Pulling this lever will manually reset both your progress on the puzzle and the Turn Counter. Logging out or leaving the Elemental Workshop will not reset your progress.
- Undo Lever - Located in front of the turn count. Pulling this lever will undo your previous move.
- Diagram - Found in a scroll crate north-west of the machine. This can provide a clue to the machine's workings and the proper method of fixing it via solving the puzzles.
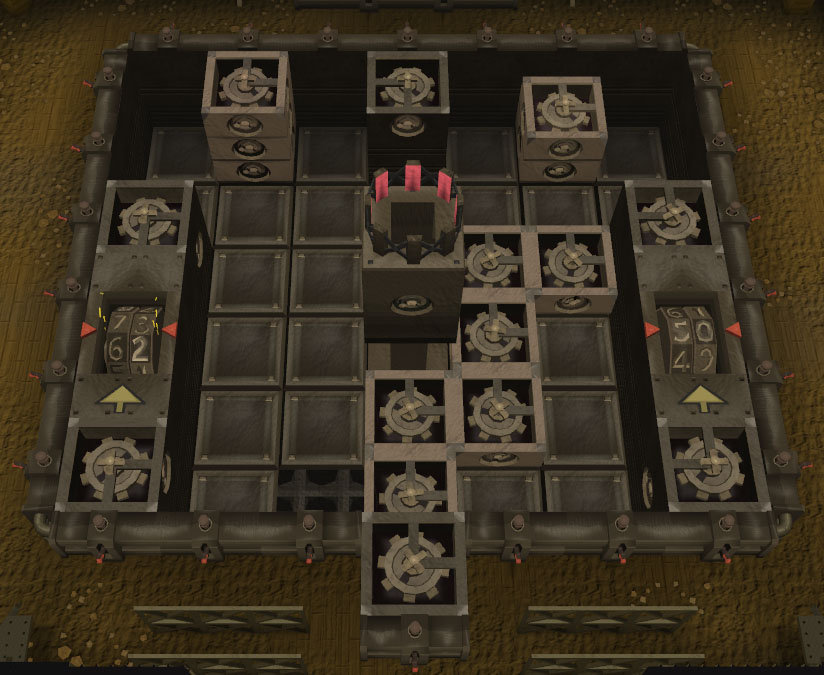
- "Change-View" Option - Magnifying glass icon that presents you with an aerial view of the machine.
|
Information on specific machine parts Hide/Show: |
- Machine Levers - there are a total of 42 Levers located on the machine's perimeter. The machine resembles a 7x6 square sliding-panel puzzle, and there are Levers for each row and column of the puzzle. From the perspective of the aerial view, the Levers along the top and bottom sides of the machine can manipulate the Mechanisms (i.e. sliding panels) and move them either to the left or right, depending upon where the empty slot is on the puzzle. The Levers along the left and right sides, on the other hand, can move the Mechanisms up or down, again depending on the empty slot's location. Note that more than one Mechanism can be moved at once; entire rows or columns can be moved so long as they're in line with the empty slot, and this will often save wasted turns.
- Mechanism Sliders - these are the components of the machine and serve as sliding panels for the puzzle. There are three types of Mechanism Sliders: 6 "Low", 1 "Mid", and 1 "Tall" (the names refer to the height of the Sliders, an important factor). These are used to fix the machine by solving the 3 seperate puzzles you'll be presented, with each type having a distinct purpose.
- Drive Mechanism - there is only one Drive Mechanism on the machine, and it serves the purpose of "activating" the Mechanism Sliders when they are aligned with it. To fix the machine, players must ensure that the Sliders are activated when attempting to solve the puzzles, meaning that the Sliders must be connected to the Drive Mechanism through an uninterrupted line at the end (when connecting to a terminal).
- Machine Counters - there are two Counters located within the machine itself (one each on the left and right sides, from the aerial view). These are separate from the Turn Counter, and can actually grant players extra turns should they be activated. Activating the Counters involves forming a line of Mechanism Sliders from the Drive Mechanism to the Counters' terminals (creating a closed circuit), although they must be properly connected to earn these extra turns. The Counter on the right requires that the "Mid" Slider be the last Mechanism in the chain in order for the connection to be made, while the Counter on the left requires the "Tall" Slider to be the last.
6. When you're fully comfortable with how the machine works, reset the machine (if you've made any moves) and start on Puzzle #1. Your goal is to make an uninterrupted line of the 6 "Low" Mechanism Sliders stretching from the Drive Mechanism to the north terminal of the counter on the right side (from the perspective of the aerial view) in order to close the circuit. There is more than one "solution" each of these puzzles, but so long as you can directly connect the start- and end- points, the manner in which you align the Sliders is of no consequence. Also, note that the Mechanism Sliders, when they are connected to the Drive Mechanism, will begin to "whirl" and are considered activated at that point. The entire line of Sliders from the Drive Mechanism to the Right Counter terminal must be activated for Puzzle #1 to be solved.
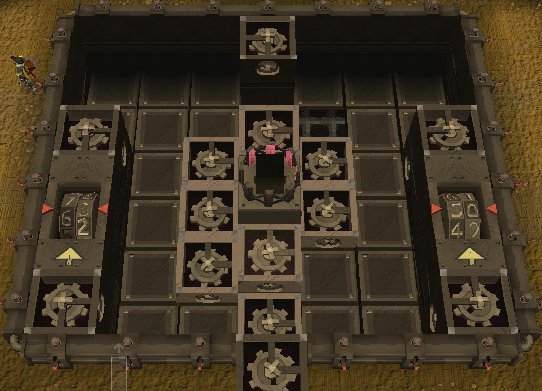
Above is a reference image, which corresponds to the codes used throughout this guide to help you solve the puzzles.
Puzzle #1 - Lowering Right Corner
To solve puzzle #1, pull the levers in the following order:
C, 2, F, 6, C, 2, F, 6, C, 2, E, 5, B, 3, F, 2, B, 3, F, 2, E, 4, F, 3, RESET
|
Puzzle #1 Completed Hide/Show: |
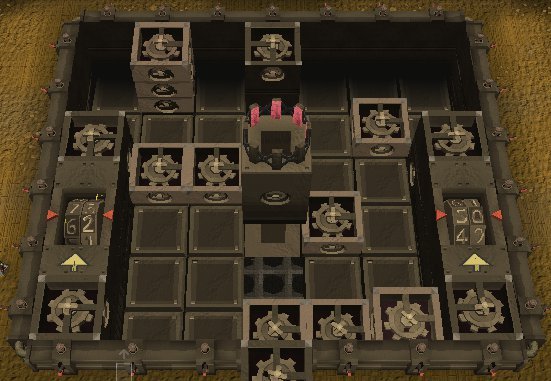
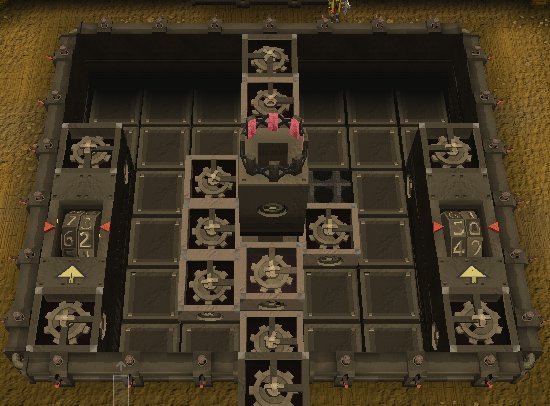
Below is a picture of Puzzle #1 Completed:
(Click the image for a larger version)
Note: if you would like a more detailed explanation of the puzzles in this quest, consider using our Elemental Workshop III Puzzle Guide. It will guide you through the puzzles one step at a time.
7. Solving puzzle part #1 will unlock the "Mid" Mechanism Slider. This unique Mechanism, along with those you used in the last puzzle, will be required later on in the puzzle. Reset your progress by pulling the Reset Lever. The "Mid" Slider will remain unlocked and you will not need to redo puzzle #1.
8. Next, you can begin on Puzzle #2. The result of completing this puzzle is 50 supplementary moves added to the main counter. This will now allow you 100 moves before the puzzle resets on its own. You must connect the drive mechanism to the south terminal of the right side counter.
Note: Puzzle #2 is optional, however it gives you room to make a mistake on Puzzle #3, which is exactly 50 moves.
Puzzle #2 - 50 Extra Moves
To solve puzzle #2, pull the levers in the following order:
5, A, 6, F, 5, A, 6, F, 5, B, 6, F, 5, C, 6, F, 5, D, 6, F, 5, E, 6, F, 5, E, 3, F, 4, E, RESET
|
Puzzle #2 Completed Hide/Show: |
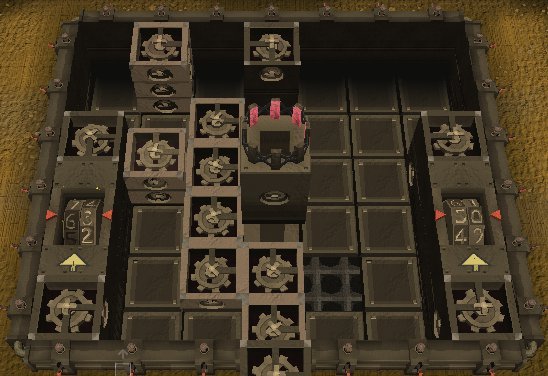
Below is a picture of Puzzle #2 Completed:
(Click the image for a larger popup of the Map)
9. Once you've reset the machine, you can begin on Puzzle #3. Similarly to the first puzzle, you'll be required to make a line of Mechanism Sliders from the Drive Mechanism to a Counter terminal. However, in this case, you must connect with the north terminal of the Counter on the left (again, from the perspective of the aerial view). Additionally, the final Mechanism in the chain MUST be the newly-gained "Mid" Slider. The circuit cannot be closed by attempting to connect an ordinary "Low" Slider, as was done in the previous puzzle. This means that one of your "Low" Sliders will not necessarily be used.
Puzzle #3 - Lowering Left Corner
To solve Puzzle #3, pull the levers in the following order:
A, 5, B, 6, C, 5, A, 6, E, 2, B, 5, E, 2, B, 5, E, 2, B, 5, E, 2, B, 3, C, 2, F, 3, B, 5, E, 3, B, 5, F, 2, B, 6, E, 5, D, 6, F, 4, E, 6, F, 4, E, 5, RESET
|
Puzzle #3 Completed Hide/Show: |
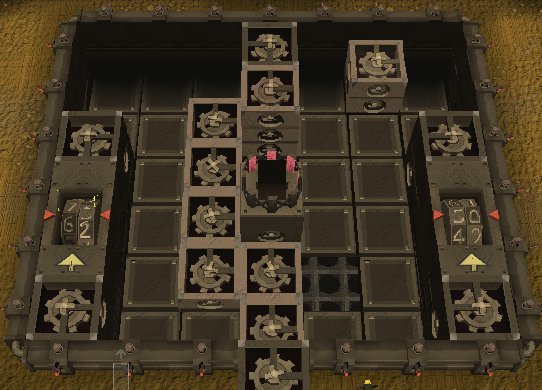
Below is a picture of Puzzle #3 Completed:
(Click the image for a larger popup of the Map)
10. Solving Puzzle #3 will unlock the "Tall" Slider. You'll need to use this along with your other Sliders to solve the next part of the puzzle, although it's sure to be much more complicated than the past few! After the "Tall" Mechanism Slider drops down, reset your progress and prepare yourself for Puzzle #4.
8. The result of completing puzzle #4 is infinite moves. This means you will no longer need to worry about using up your moves and having the puzzle reset. To accomplish this, you must connect the drive mechanism to the south terminal of the left side counter.
Puzzle #4 - Infinite Moves
To solve Puzzle #4, pull the levers in the following order:
2, A, 3, F, 2, B, 3, F, 2, C, 3, F, 2, D, 3, F, 2, E, 5, B, 3, E, 6, F, 3, E, 5, F, 3, E, 4, F, 3, E, RESET
|
Puzzle #4 Completed Hide/Show: |
Below is a picture of Puzzle #4 Completed:

(Click the image for a larger popup of the Map)
11. Now you'll need to create a direct line of Mechanism Sliders connecting the Drive Mechanism to the terminal at the opposite side of the machine. The "Tall" Slider you obtained will come into play here - it MUST be the final link in the chain connecting to the terminal or the circuit will not be closed. You will also need to contend with the Pillar stationed in the centre of the machine; while it did not pose a problem before, you'll have to loop your chain of Sliders around it to reach the opposite terminal.
12. After you managed to solve Puzzle #5, the central Pillar will fall, and you'll be ready to move on to the next part. Be sure you have reset your progress before you start Puzzle #5.
Puzzle #5 - Lowering the Middle
To solve Puzzle #5, pull the levers in the following order:
B, 2, A, 3, B, 2, F, 6, B, 2, D, 3, E, 5, D, 6, F, 4, E, 6, C, 5, E, 6, D, 5, E, 6, F, 3, E, 6, F, 4, E, 5, DO NOT RESET
|
Puzzle #5 Completed Hide/Show: |
Below is a picture of Puzzle #5 Completed:
(Click the image for a larger popup of the Map)
Note: DO NOT RESET YOUR PROGRESS! Doing so will require that you complete Puzzle #5 again, so it's very important that you be aware of this.
Note: The fallen Pillar is not another Mechanism Slider or anything of the sort; it is stationary and will be used again to solve the remainder of the puzzle.
13. For Puzzle #6, rather than connecting your Mechanism Sliders to a terminal on the outside walls of the machine (as you've been doing until now), you will have to connect them to all four sides of Pillar. The only stipulations to this are that the "Tall" Slider must connect with the side of the Pillar furthest away from the Drive Mechanism, while the "Mid" Slider must be connected to the side closest to it. "Low" Sliders can be used to connect to the other two sides of the Pillar. Create an activated chain satisfying these conditions and the circuit will be closed.
Puzzle #6 - Making Central Pillar Spin
To solve Puzzle #6, pull the levers in the order listed below. The
C, 4, B, 6, E, 4, F, 6, A, 5, E, 6, B, 2, F, 6, B, 2, F, 6, C, 5, E, 6, F, 4, E, 5, B, DO NOT RESET
|
Puzzle #6 Completed Hide/Show: |
Below is a picture of Puzzle #6 Completed:
(Click the image for a larger popup of the Map)
Note: for the first couple of moves, the game may claim that nothing interesting happens. Just ignore this.
14. To finish with Puzzle #7, reconnect the chain of Mechanism Sliders to the terminal on the opposite side of the machine from the Drive Mechanism. There's no need to worry about the Pillar now, and the only requirement in this part is for the "Tall" Slider to connect to the opposite terminal. The "Mid" Slider no longer needs to be connected anywhere specifically, so concentrate on just manipulating the activated Sliders across to the other side of the machine.
Puzzle #7 - Raising the Central Pillar
To solve Puzzle #7, pull the levers in the following order:
4, C, 5, DO NOT RESET
|
Puzzle #7 Completed Hide/Show: |
Below is a picture of Puzzle #7 Completed:
(Click the image for a larger popup of the Map)
15. You'll know you've solved Puzzle #7 once you close the circuit and a cutscene occurs. The Pillar will rise up once more and the Machine will be operational. At this point, you can continue with the quest and begin preparations to create Body equipment - your original purpose in repairing the Machine.
| Making the Body Body | |
| Required Items | Ragged elemental key, Slashed book, Hammer, 2 Primed bars |
| Recommended Items | - |
16. Now that you've repaired the machine, climb the stairs and return to the Control Room. It will still be open if you inserted one of your Primed bars into the slot earlier, so go inside.
17. Inside the Control Room, flip the nearby Lever to close the door and press the "Big Red Button" next to it. The Primed bar you inserted into the slot will be infused with the Body energy the machine generates. Flip the lever again to unlock the door and collect the Body bar you've just created!
Note: Pressing the button and creating a Body bar will drain 33 points from your Defence skill each time.
18. Unfortunately, one Body bar will not be enough to make a Body body, so you will have to infuse the second Primed bar you brought along. The "Big Red Button" will be stuck after one use so you'll need to return to the Puzzle Room. Essentially, you must manipulate the machine and cause the central Pillar to fall back down and rise again (charging it in the process).
To recharge the machine, pull the levers in the following order:
4, 5, 4, B, C, 5, No Reset
Once the machine is recharged, create your second Body bar by pressing the "Big Red Button" again upstairs in the control room.
19. At long last, take your two body bars upstairs to the first floor of the Elemental Workshop. There, use your Body bars on an anvil (with the slashed book and ragged book in your inventory) to make a Body body. Congratulations, quest complete!
Reward
- 2,000 Smithing experience
- Book of Knowledge
- 50 Coal (noted)
- Ability to make/equip Body Equipment
- 2 Treasure Hunter keys
Quest points: 1
This quest is a requirement for:
Tips, Tricks & Notes
- If you're having trouble solving the puzzles, consider using our Elemental Workshop III Puzzle Guide. It will guide you through the puzzles one step at a time.
- After the quest, you can use the combination 4, 5, 4, B, C, 5, No Reset to make more primed body bars quickly as long as you do not reset. If you accidentally reset, you will need to redo puzzles 5 through 7 to get back to this stage.
- The 'Book of Knowledge' quest reward can grant additional experience in Defence (8,500 XP) and Smithing (6,500 XP).
- The sliding-mechanism puzzles in this quest are somewhat similar to the Treasure Trails Puzzles, albeit on a much larger scale.
- The mechanism will NOT reset should you log out or leave the body room.
- The Body equipment is tradeable and so can be purchased on the Grand Exchange; this may be a better option than making it for yourself, since creating Body bars requires completing the quest puzzle multiple times.
- A Slashed book is required in order to create Body equipment.
Credits
Written by: Rien Adelric
Special thanks to: Cowman_133, DaDieselDude05, Sy Accursed
Thanks to: acid_heart0, All Bogs, Aurhora, Franktheman, Jaffy1, Vhellcat, Woodsman198, Xena Dragon, War Chipmunk, Zaaps1
Last updated: 28-Jun-2015
| RuneScape 2007 |
| Find this page on the Internet Archive with a date as close to Aug 10, 2007 as possible. |

Add a Tip.It button to your web site:
© 1999 - 2026 RuneScape Tips, all rights reserved.
RuneScape® and Jagex® are trademarks of Jagex Ltd © 2000 - 2026 Andrew Gower.
Reproducing or copying any material found on this page is not allowed. Designed for IE8+, Firefox 3.5+, Safari 4+, Opera 10+, and Chrome by Mil.