
Construction Guide
Introduction
Beginner's Walkthrough
Levels and Experience
Rooms
Rooms Layout
Materials Overview
People
House Options Interface
Agility Shortcuts
Tips and Tricks
Credits
Introduction
Construction is a long-awaited members only skill. It allows players to build a mansion with up to 33 rooms, build furniture, decorate the house, and invite friends into their exclusive domain. So, what could you do in your house, you ask? Player-owned houses are very useful as they provide various teleportation options or an altar at which you can pray. But there are many fun activities to do in a house as well. You could ring a bell to call your servant, who will serve food or drinks. The food will be useful if you call your friends over for a friendly boxing match. You could also play many non-combat games with your friends, such as darts. Or you could simply spend your time watching through a telescope, making yourself beautiful or playing music. You could also craft toys, paint armour or warm yourself in front of a fire, to give just a few examples of the many things that can be done at home...

An extremely useful reference for any player is the complete and sortable Construction Table, listing ALL rooms, items, materials, XP, and descriptions in one place (instead of only by room).
Return to Top
Beginner's Walkthrough
To begin, take 1000 coins to an Estate Agent's office in Varrock, Falador, East Ardougne, or Seers' Village (for detailed maps see the Estate Agents section.) He sells you a house at the initial location, which is in Taverley just north of the bank/lodestone. He also gives you a book, which has some information about Construction.
Now grab some cash and some normal logs (at least 11) and head east outside Varrock's walls to the lumberyard (east of the Jolly Boar Inn). Buy a Saw right away from the Sawmill Operator at the Lumberyard's south entrance (13 coins). He will also take your logs and change them into planks for 100 coins each. Get several pack loads made, to save travelling back here again. You can also get Oak, Teak or Mahogany planks made, for higher fees (see Materials), although you won't be able to use them until your Construction level is higher.
You should also buy some Bolts of cloth from him, for 650 each. Get a good supply - at least 5 to start. (Note that player-made Cloth woven at Looms will not work.)
You will need nails. Iron nails fail some of the time - steel nails fail less often. At least 50 is a good starting supply. Don't invest in thousands, as Oak planks and above do not require nails.
If you want to plant your garden first, go to Falador Park and buy at least 2 Bagged Plant 1 from the Garden Supplier east of the Tree patch. Bring your Watering can to your house along with the plants.
If you want to build a Fireplace right away, bring 3 soft clay.
Now get a hammer, your saw, 11 planks, 5 bolts of cloth, at least 11 nails (twice or triple as many to allow for breakage, but they are stackable), and perhaps 10K coins. Also bring your 2 Bagged plant 1's and 3 soft clay, if desired. Go to your house in Taverley. The large glowing portal is the entrance to your very own house, shown on the minimap with this icon: ![]() When you click on the portal, a selection menu appears.
When you click on the portal, a selection menu appears.
Choose building mode. You will be teleported to your house, in the build mode options you can choose between teleporting to outside of the house portal, or alternatively directly into your house.
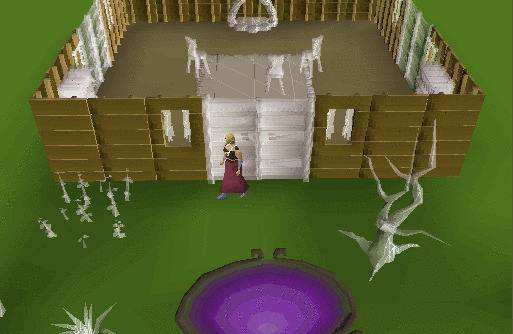
Welcome! Notice how quiet and peaceful it is. There will be nobody stepping all over the place unless you invite them!
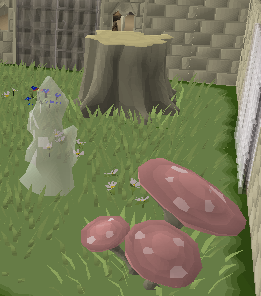
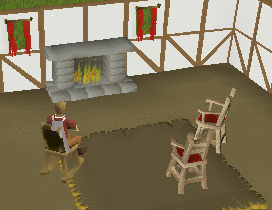
You arrive in a ghostly garden (each item is a potential "spot" to make or plant something). When you click inside your rather tumbledown shack you will see similar ghostly items. Walk to one of the chairs and select "Build". A menu of chair types will appear. Select the Crude wooden chair (the only one you can make at Level 1). Two planks and two nails will be consumed (assuming your nails don't break), and you will have a real chair for sitting! Make a second chair now. You will get a Construction level (total 116 XP)!
At level 2 you can make a rug (2 cloth; 30 XP), as well as some torn curtains (3 planks, 3 cloth, 3 nails; 132 XP) which cover all windows in the room. This brings your level high enough to make a Bookcase (4 planks, 4 nails; 115 XP). Do it!
Congratulations, you are now Level 5 and ready to build a Kitchen (5000 gp) and progress further in Construction!
If you brought soft clay, you can also make a Fireplace (3 soft clay; 30 XP). If you brought Bagged Plant 1's, pick any plant location (small or big, 1 or 2) in your garden and plant them. You can start a second Garden for 1000 coins, as well, and plant more. Planting also earns equal amounts of Farming XP.
Return to Top
Levels and Experience
A complete and sortable Construction Table, listing ALL rooms, items, materials, XP, and descriptions is now available. The table pops up showing only levels 1 to 20 at first, but allows you to sort and filter it many ways to focus on items of interest.
| Construction Table |
Return to Top
Rooms
Almost all the rooms in your house offer special features. Listed below are some of the most important features, which hopefully will help you in your game life.
At every 5 skill levels, you are able to build a new room type. Costs rise with higher level rooms. Take careful note of the doorways each room offers, so that when you build the room you can position it accordance with your house needs. Stairway rooms may require additional effort, since the stair will ascend from the side of the room opposite the doorway where you installed it. (If you want the bottom of your stairs to face the front of the house, build the room from the doorway behind the desired location.) Click on the room name in the table below to pull up a sortable table of the items that can be built there, showing the level needed, materials, experience, hotspot, and uses.
| Rooms | ||||||||||||||||||||||||||||||||
| Item | Name | Level | Cost | Summary | Doorways | |||||||||||||||||||||||||||
| Garden | 1 | 1000 gp | Decoration, Exit Portal, possible Dungeon Entrance | 4 | ||||||||||||||||||||||||||||
| You will already have a garden when you buy your house. In the garden you'll find an exit portal which will take you from your house back to the rest of RuneScape. If you have more than one garden (either normal or formal), you may choose to build a portal, a decorative centrepiece or an entrance to your dungeon (if you have one). You also get an equal amount of farming XP for planting in your garden (for example, if you get 70 construction XP for planting, you'll also get 70 farming XP). | ||||||||||||||||||||||||||||||||
| Parlour | 1 | 1000 gp | Sit in chairs by a fire, retrieve completed quest books | 3 | ||||||||||||||||||||||||||||
| The most important feature is the bookcases (which can be built in several types of rooms), containing books from the quests you've completed. You'll be able to remove and read them all; hopefully this will save you some bank space. Note that lighting fires in fireplaces (in all rooms) requires normal logs, but gives 80 XP (double the usual). | ||||||||||||||||||||||||||||||||
| Kitchen | 5 | 5000 gp | Water source, obtain food supplies, cook, home brew ale, cat corner | 2 adjacent | ||||||||||||||||||||||||||||
| The kitchen is useful if you cook a lot, or need water. You can make your very own sink, a range or even an oven! You can build 3 different types of larder (depending on your level), which offer endless supplies of basic ingredients. The shelf hotspot provides unlimited cooking tools/items. Building an ale barrel gives an unlimited supply of that ale (flatpack barrels may be purchased from other players if you lack the level for your favourite ale). The most important feature here may be making tea, which can temporarily raise your construction by 1 to 3 levels! | ||||||||||||||||||||||||||||||||
| Dining Room | 10 | 5000 gp | Sit at table, summon servant, eat served food | 3 | ||||||||||||||||||||||||||||
| There isn't much "special" in the dining room. You can build a bell pull which will summon your servant (if you have one). In addition to sending your servant to the bank (or sawmill), s/he can be ordered to serve food and place it on the table. You and your friends can sit at the table and eat. You can also make wall decorations displaying your family crest. | ||||||||||||||||||||||||||||||||
| Workshop | 15 | 10,000 gp | Build furniture, craft, heraldry, repair broken and damaged weapons, and obtain tools | 2 opposite | ||||||||||||||||||||||||||||
| This is an important room. You can build tool spaces which supply unlimited tools. At the workbench, you can construct furniture flatpacks for the usual XP. These can be dropped, or sold/given to other players who cannot make/afford them flatpacks also have a make-x option. This allows you to train outside of building mode - no need to remove and rebuild while grinding levels! The repair bench is for fixing broken equipment. If you have the right level, your barrows items will still cost you a bit, but less than getting it repaired by Bob, Dunstan or Tindel. Miscellaneous junk items such as damaged armour, broken arrows or staves and rusty swords can also be repaired for very small skill XP. At the heraldry station, add your family crest to helmets and kiteshields (steel or rune), and even make banners! Finally, at the crafting table you can make clockwork toys (such as a cat) and other items (see Crafting guide.) | ||||||||||||||||||||||||||||||||
| Bedroom | 20 | 10,000 gp | Change basic appearance, hairstyle and clothing; two with beds required to hire servant | 2 adjacent | ||||||||||||||||||||||||||||
| The main thing about bedrooms is that two of them are required to hire a servant. You can also change your appearance for free: no more paying the hair dresser in Falador or the clothes shop in Varrock to change the colour or style of your hair or clothes. Higher levels of dressers and wardrobes offer more choices. |
||||||||||||||||||||||||||||||||
| Skill Hall | 25 | 15,000 gp | Display skills and trophies, optional stairway (faces opposite from doorway where you created it) | 4 | ||||||||||||||||||||||||||||
| You may build a staircase here to go upstairs or access a dungeon/basement level. Note that only one upper floor is allowed, and one dungeon/basement level. Other than that, this is a "show off" room. If you've killed a crawling hand, a king black dragon, or even a kalphite queen and gotten a head (or hand!), you can mount it here (visit the taxidermist first, though.) A trophy fish can also be mounted. Note that when you remove a trophy display, the trophy item is *not* recoverable. Castle Wars armour can be displayed. To display regular armour (mithril to rune), you must have the Smithing level to make it yourself (also, a skirt is required, not legs). When you remove an armour display, you will recover the armour. However, if you remove the entire Skill hall, all of your display items are gone forever. | ||||||||||||||||||||||||||||||||
| Games Room | 30 | 25,000 gp | Play games and train | 3 | ||||||||||||||||||||||||||||
| The games room is a fun place to interact with your friends. You can install 8 different games, and you can even add prizes for the winners (using the prize chest, money only)! | ||||||||||||||||||||||||||||||||
| Combat Room | 32 | 25,000 gp | Private multicombat training | 3 | ||||||||||||||||||||||||||||
| Another great room to interact with friends and guests. There are 5 different games you can build; however, there is no prize in this room (only the joy of showing your friends who's the best). If you or your guests die, you will not lose anything, but simply respawn in the house. | ||||||||||||||||||||||||||||||||
| Quest Hall | 35 | 25,000 gp | Display quest achievements, optional stairway (faces opposite from doorway where you created it) | 4 | ||||||||||||||||||||||||||||
| Like the skill hall, you can build a staircase taking you up or down in your house. A very useful feature in this room is that you can mount an uncharged Amulet of glory (made with dragonstone, see our crafting guide) to get unlimited teleports to the usual glory destinations. Otherwise, this is a "show off" room to display quest pictures, swords, and guild souvenirs. | ||||||||||||||||||||||||||||||||
| Menagerie | 37 | 30,000 gp | Store and feed all fully-grown pets, recharge Summoning points | 4 | ||||||||||||||||||||||||||||
After building a pet house and a feeder, you can store fully grown pets here (including cats, see Pet Care guide). The amount of pets that can be stored is based off of the type of house and feeder built. You can add multiple pets of the same breed and any colour. Pet Feeders ensure your pets won't wander off due to hunger, and can also feed a pet following you or in your inventory. You can build a miniature Summoning obelisk here to recharge your Summoning points as well.
|
||||||||||||||||||||||||||||||||
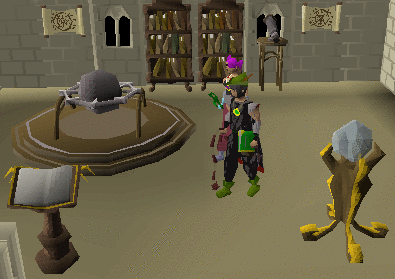
| Study | 40 | 50,000 gp | Create magic spell tablets, change elemental staff, telescope, statue of Dahmaroc | 3 | ||||||||||||||||||||||||||||
| Lecterns allow you to make tablets of different spells, such as teleport spells, there is a 'make-x' option on these. A tablet allows any player of *any* magic level to teleport without carrying runes. Tablets save inventory spots; a Falador teleport tablet uses only one inventory space, rather than three. To make a tablet, you need some soft clay and the runes for the spell (staves are allowed). Magic XP is earned by the tablet maker, not the user. Higher level lecterns offer more spell selections. See the Magic Guide for a listing of the spells. Another study feature is the crystal ball, which can change an element staff (fire, water, air and earth) to any other element (a basic "staff of" costs no runes, a battlestaff costs 100 runes, and a mystic staff costs 1000 runes). The telescope will show the time of the next Shooting star if one is landing soon. You can also add the plinth and statue replica pieces from Shattered Heart minigame. | ||||||||||||||||||||||||||||||||
| Costume Room | 42 | 50,000 gp | Store unusual clothing items such as Treasure Trail rewards, Random event costumes, Minigame armour, Magic robes/armour, Holiday items and Capes. | 1 | ||||||||||||||||||||||||||||
| Only 1 costume room is allowed in your house. There are strict rules about what can be stored in each piece of furniture. The most awkward is that a *complete* set of an outfit is required to store it: for example, shield, helm, plate and legs. Untradeable holiday items you've collected are always available if you've dropped or destroyed yours - just grab another from your toy box (any level). For other hotspots, higher level furniture holds more and different types of costumes. For example, treasure chests hold clue rewards up to level 1 (oak), 2 (teak) or 3 (mahogany). The definitions for what can be stored in each piece of furniture are shown in the Costume Room guide. Safeties have been built in to protect your costumes. You cannot remove furniture nor the rooms without withdrawing your items. Also, if you have a PIN set, you will need to enter it before you can get costumes out. If you don't have the level to build furniture that will hold all of your costumes, consider skipping the XP and just buying flatpacks from another player for your storage needs. |
||||||||||||||||||||||||||||||||
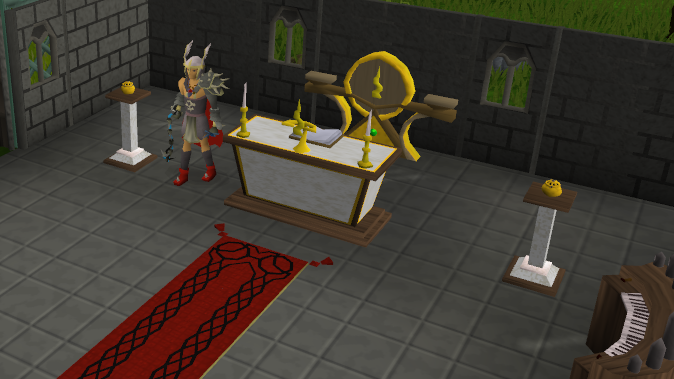
| Chapel | 45 | 50,000 gp | Offer bones for prayer experience | 2 adjacent | ||||||||||||||||||||||||||||
| Build an altar to restore your prayer at any time, and offer bones on it for prayer experience. With the right combination of the highest level altar and incense burners, offering bones can earn up to 350% of the normal XP for burying bones (compare to 400% for ectofuntus after much grinding and hauling.) Now you can select "offer all" or a specific number to remove tedious clicking (although it still takes the same amount of time) when offering bones. Torches and candlesticks don't boost prayer XP; but (oak) incense burners work just as well as the higher burners. Firemaking level 30 is required to light them. Be sure to bring two marrentill herbs and a tinderbox! Building a god symbol or icon "dedicates" your chapel to that god, and changes any statues, windows and altar to match. Despite Bob the Jagex Cat's hints that he's a god, he doesn't affect altars. |
||||||||||||||||||||||||||||||||
| Portal Chamber | 50 | 100,000 gp | Teleport to selected cities | 1 | ||||||||||||||||||||||||||||
| You can build up to three portals in one portal room. The centrepiece is used to direct or "focus" a portal on any one of the following locations: Varrock, Lumbridge, Falador, Camelot, Ardougne (Plague City quest), Watchtower (Watch Tower quest) and Kharyrll (Ancient Magick). (Note: you must be eligible to cast the teleport spell. However, you do not need to be on Ancients to cast the Kharyrll spell.) Focusing a portal requires 100 times the runes normally used for that teleport. So, for a portal to Varrock, you'd need 100 fires, 300 airs and 100 law runes (staves and combination runes not allowed.) After a portal has been directed, it gives unlimited teleports to that location. Other players can use the portal (Priest in Peril quest required for Kharyrll) even if they cannot cast the related teleport spell. You can also tear down the portal (to upgrade the wood) without refocusing it. The highest level centrepiece also has a scry option. Use it to view a portal destination in real time, turning the camera angle with your arrow keys. It's fun to see what's going on in different locations, or who's waiting for you there. Since a room only has three portals, you can't have all seven in one room. Most players build two portal rooms to make six portals (house location may make the missing seventh unnecessary). |
||||||||||||||||||||||||||||||||
| Formal Garden | 55 | 75,000 gp | Decoration, optional Exit Portal or Dungeon Entrance | 4 | ||||||||||||||||||||||||||||
| This is a far more elaborate version of the normal garden. An exit portal and dungeon entrance are still allowed as the centrepiece, but other options have been replaced by the gazebo or fountains. The rest of the garden is also much fancier. Trees have been replaced by optional hedge and border fence corners. Plant hotspots are now used for flowers. Any flower planting is replicated in the opposite corner, so only 4 bagged flowers are needed to get 12 beautiful plants. |
||||||||||||||||||||||||||||||||
| Throne Room | 60 | 150,000 gp | Receive visitors, use lever to activate floor trap or dungeon challenge mode | 1 | ||||||||||||||||||||||||||||
| The most important hotspot in this room is the lever, which has several different options. For example, if people are standing on your floor piece (floor hotspot), you can pull the lever and drop them into your oubliette below, or expel them from your house. Higher level floor features also have the ability to trap the person before the person decides what to do with them. Right click the lever to enable either challenge mode or player vs. player (PvP) mode. In challenge mode the objective is to get to the chest in your treasure room (if you have one). PvP adds a bit of excitement; players can 'kill' each other all over your house! Great fun for your visitors as well. Note that if you die you won't lose any items, you'll simply be teleported outside the house. |
||||||||||||||||||||||||||||||||
| Aquarium | 63 | 200,000gp | Dive in your own aquarium! | 4 | ||||||||||||||||||||||||||||
| The aquarium is a room in your house dedicated to housing your aquatic treasures. Hatched from Golden Mystery Eggs found via certain fishing spots, fish will appear here as they are unlocked. You can even dive in and literally swim with the fishes should you wish! This room is not only for show; it can also be used to unlock Prawn Perks, including a slight increase to your fishing experience or benefits such as fishing without the hassle of bringing along bait. The aquarium can also be reset several times by using plugs on it, which is necessary to unlock all of the content. |
||||||||||||||||||||||||||||||||
| Oubliette | 65 | 150,000 gp | Fend off monster while trying to escape trap | 4 | ||||||||||||||||||||||||||||
| If you build this below your throne room, and the trap door is activated, players will be dropped into a cage in your oubliette. Here they will take damage from any floor trap you've planted, and will have to fight for their lives to make it out in time. They can get out of this cage by picklocking the right place in the fence surrounding the cage. You can add a guard (anything from a skeleton to a hell hound) which will attack players during challenge or PvP modes. You can also build teleport traps elsewhere in your dungeon to transport players into this cage if you wish. Note that if you die you won't lose any items, you'll simply be teleported outside the house. | ||||||||||||||||||||||||||||||||
| Dungeon | 70 | 7500 gp 10,000 gp (Pit) |
Fight through monsters and traps towards Treasure Room | 2 or 4 | ||||||||||||||||||||||||||||
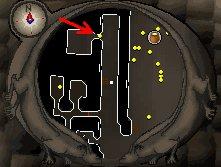
| Basically you can build your very own barrows maze down here. It's all to prevent your visitors from getting to your treasure room during PvP or challenge modes (see Throne room). You can build traps and even add guards to stop intruders. There are many fun things to play around with, if you have the cash for it. The corridor has a doorway on each end, and a junction has doorways on all four sides. This enables you to make corridors in other directions, to make it more confusing for your visitors to find their way around your dungeon. | ||||||||||||||||||||||||||||||||
| Treasure Room | 75 | 250,000 gp | Fight a final monster boss to unlock treasure chest | 1 | ||||||||||||||||||||||||||||
| This is what the above three rooms have been all about - your very own treasure room! This room contains the reward you supply for the challenge and PvP modes. It also holds the final obstacle for these modes; your boss monster. The monster you buy can range from a level 82 Lesser demon to a level 246 Steel dragon, depending on your level and how much you want to spend. It is great fun, and the harder the monster, the harder the game, eh? Note that if you die you won't lose any items, you'll simply be teleported outside the house. |
||||||||||||||||||||||||||||||||
Return to Top
Rooms Layout
As your Construction level increases, you will be allowed to build your house in a larger layout. The limit is up to a maximum of 33 rooms in a 7 rooms by 7 rooms footprint. You are allowed one upper floor (start by building stairs in a hall), and one lower floor for your dungeon (start with dungeon entrance in a garden).
| Levels and Layout Size Limit | |
| Level | Square Rooms Footprint |
| 1 | 3x3 |
| 15 | 4x4 |
| 30 | 5x5 |
| 45 | 6x6 |
| 60 | 7x7 |
Your maximum allowed number of rooms also increases with higher Construction Level. This increase starts at level 38 up to level 99. The maximum room number to construction level is listed below.
| Levels and Total Room limit | |
| Level | Maximum number of Rooms |
| 1 | 21 |
| 38 | 22 |
| 44 | 23 |
| 50 | 24 |
| 56 | 25 |
| 62 | 26 |
| 68 | 27 |
| 74 | 28 |
| 80 | 29 |
| 86 | 30 |
| 92 | 31 |
| 96 | 32 |
| 99 | 33 |
Return to Top
Materials Overview
The Construction skill employs a wide variety of materials. Here is an overview of the materials, including where you can buy them, how much they cost, and how you can use them. Each item type yields a consistent number of experience points (XP) when used to build something, so you can select the materials which are most cost effective for you.
With every level you gain you will be able to construct more and more furniture for your own house. At higher levels, you can use different types of more expensive materials.
Due to the rising fee scale charged by the Sawmill Operator, it is generally agreed that teak and mahogany planks are not cost effective for skill levelling (higher gp per experience earned). Although oak planks are a bit more gp per XP (2.5 times the sawmill fee for normal logs, but only 2 times the experience), they are faster because there's more experience per load. Normal (from logs) 3.46gp/XP, Oak 4.166gp/XP, Teak 5.55gp/XP, Mahogany 10.7gp/XP. Obviously, normal planks picked up from spawns cost nothing, but the collection time and number of loads required is usually discouraging, and the required nails must still be bought or made.
| Materials | ||||
| Tools | ||||
| Pic | Name | Uses | Locations | XP |
| Hammer | Crucial tool! | Buy at any general store. | n/a | |
| Saw | Crucial tool! | Buy at the lumberyard from the Sawmill Operator; choose the "trade" option. | n/a | |
| Crystal Saw | Use instead of a saw. Gives a hidden +3 skill bonus. | Reward from Eyes of Glouphrie quest | n/a | |
| Wood | ||||
| Pic | Name | Uses | Locations | XP |
| Plank | Build low level (1-15) furniture (requires nails). | Chop ordinary trees and take them to the Sawmill Operator. He'll turn them into planks for 100gp each. | ~28.9 with nail | |
| Oak plank | Build medium-low level (15 - 35) furniture. | Chop oak trees and take them to the Sawmill Operator. He'll turn them into planks for 250gp each. | 60 | |
| Teak plank | Build medium-high level (35 - 50) furniture. | Chop teak trees and take them to the Sawmill Operator. He'll turn them into planks for 500gp each. | 90 | |
| Mahogany plank | Build high level (50+) furniture. | Chop mahogany trees and take them to the Sawmill Operator. He'll turn them into planks for 1500gp each. | 140 | |
| Protean plank | Build any furniture. | Won on the Squeal of Fortune. These planks can be used in place of any of the above planks to make furniture. | Varies | |
| Those who have completed the Dream Mentor quest have access to a Lunar Magicks spell that helps in making planks. The level 86 Plank Make spell allows the caster to convert one log into a plank for a charge. These charges are cheaper than the sawmill operator, most likely to incorporate the cost of casting the spell, which requires 2 astral runes, 15 earth runes and 1 nature rune. Ordinary logs cost 70 coins per cast, Oak logs cost 175 coins per cast, Teak logs cost 350 coins per cast and Mahogany logs cost 1050 coins per cast. |
||||
| Stones and metal | ||||
| Pic | Name | Uses | Locations | XP |
| Soft Clay | Make clay constructions such as fireplaces, or use to support shelves. | Mine some clay, and use a bucket or jug of water on it. No level requirements. | 10 | |
| Limestone brick | Make sturdy stone items (statue, fireplace, staircase, altar, etc.) | Mine limestone east of Varrock or Arandar, then use chisel on it. Or, buy at Mort'ton shop or the Stonemason in Keldagrim. | 20 | |
| Iron bar | Make exit portals. | Mine iron ore and smelt in a furnace; level 15 Smithing is needed. | 10 | |
| Steel bar | Heavy construction in many rooms (Kitchen, Hall, Workshop...). | Mine 2 coal and 1 iron ore, and smelt in a furnace; level 30 Smithing is needed. | 20 | |
| Nails | Use with normal planks. | Use a hammer at an anvil to smith a metal bar into nails (see the Smithing guide). All nails will bend occasionally, but less often if they are made from higher-level metals. Iron or Steel is recommended. | See plank entry | |
| Miscellaneous | ||||
| Pic | Name | Uses | Locations | XP |
| Bolt of cloth | Make curtains, beds, rugs,... | Buy from the Sawmill Operator, north-east of Varrock. | 15 | |
| Molten glass | Used in various types of furniture, such as Crafting tables, Shaver stands,... | Get some seaweed and a bucket of sand. Cook the seaweed in order to get soda ash. Use it with the bucket of sand on a furnace. No level requirement. (Refer to Crafting guide.) | 1 | |
| Rope | Make a bell pull for summoning servants. | Buy in general stores throughout RuneScape. | 4 | |
The Stonemason in Keldagrim also sells some highly expensive materials for the most advanced construction workers. See the Stonemason heading.
Return to Top
People
There are a number of non-player characters (NPCs) who are critical to the Construction skill. Each offers different services for fees, and/or items you can buy.
Estate Agent
The skill begins with an Estate Agent. There are four locations: in Varrock, located just west of the chapel (east of the palace); in Falador, east of the furnace; in Seers' Village, north-east of the bank; and in Ardougne, west-south-west of the market square.
|
|
|
|
Estate Agents sell your basic house located in Taverley for 1K. You can also have them redecorate the exterior of your house, or move it to a new city, but the styles and locations available depend on your skill level. Note that the yard for most styles is grass, but the whitewashed stone has sand (desert look) and the Fremennik decor has dark hard-packed earth (Rellekka look). Click on a decor name below to see what the inside and outside will look like.
| Estate Agent decor | ||
| Item | Level Required | Fee (gp) |
| Basic Wood | 1 | 1K |
| Basic Stone | 10 | 5K |
| Whitewashed Stone | 20 | 7.5K |
| Fremennik-style Wood | 30 | 10K |
| Tropical Wood | 40 | 15K |
| Fancy Stone | 50 | 25K |
| Dark Stone | -- | Free After completing Love Story |
| Estate Agent relocations | |||
| New location | Map | Minimum Level Required | Fee (gp) for Move |
| Rimmington | |
1 | 5K |
| Taverley | |
1 | 5K |
| Pollnivneach | |
20 | 7.5K |
| Rellekka | |
30 | 10K |
| Brimhaven | |
40 | 15K |
| Yanille | |
50 | 25K |
Use your level 40 Magic teleport (1 Law, 1 Air, 1 Earth rune) to your house. It saves a lot of walking. Wielding an elemental staff would save one pack space. Using a Dust rune would also save a space in your pack. Using a teleport tablet (made in a Study) saves two spaces!
You may move or redecorate your house as many times as you wish to pay. Different locations offer different travel amenities, and bank access may play a key role in selecting your home location. From Rimmington, players have a choice of banking in Falador or Draynor Village, or taking the Port Sarim ship to bank on Pest Control island. Homeowners in Taverley may wish to use a Falador teleport, a Burthorpe games necklace teleport, the Dwarven passage from Catherby, or possibly even the White Wolf Mountain glider. Pollnivneach residents will want to use flying carpets and bank at Shantay Pass. Rellekka homeowners might take advantage of the Fremennik lyre teleport, and possibly use the Etceteria bank. Brimhaven residents can glory amulet to Karamja and walk home, or sail to/from East Ardougne. Yanille homeowners have it best, with a bank right down the street. Amulets of glory and duelling rings are a convenient way to get to banks (Edgeville and Castle Wars). Fairy rings and other transport methods may also be helpful (see Tip.It's Getting Around Guide.)
Return to People
Sawmill Operator
The Sawmill Operator is located at the entrance to the Lumberyard north-east of Varrock. He sells saws, cloth and nails, and changes logs into planks for a fee. Although normal planks spawn around Runescape, this man (generally referred to by players as "a thief", "that bandit", and "the richest man in Runescape") is the only source for oak, teak and mahogany planks.
| Sawmill Supplies | ||
| Item | Player must supply | Fee (gp) |
| Saw | no items | 13 |
| Plank | Logs | 100 |
| Oak Plank | Oak Logs | 250 |
| Teak Plank | Teak Logs | 500 |
| Mahogany Plank | Mahogany Logs | 1500 |
| Cloth | no items | 650 |
| Bronze Nail | no items | 1-2 |
| Iron Nail | no items | 1-5 |
| Steel Nail | no items | 1-5 |
Players can make nails themselves, of course (using the Smithing skill), rather than buying them here.
Suggestions for improving materials transport efficiency include chopping logs near your house, then having your (level 30+) servant take them to the sawmill. This avoids repeated bank runs.
The Enlightened Journey quest provided a new sawmill travel option - the balloon. Upon unlocking the appropriate travel routes, players can fly from the Castle Wars balloon (located north-east of the building) to the Varrock sawmill for the cost of one willow log. Carrying the willow log and cash for the sawmill operator leaves 26 slots for logs to be planked. Wearing lightness clothing (agile legs, agile top, boots, hunter cape, gloves) is suggested, as well as a ring of duelling to return to Castle Wars.
Return to People
Stonemason
The Stonemason is located in Keldagrim, on the west side of town, south of the Bank. He sells construction materials. The fee, purpose, and experience points earned for each item used are listed below.
| Stonemason Supplies | ||||
| Name | Item | Fee (gp) | Purpose | XP |
| Limestone brick | 45 | For making sturdy stone items (statue, fireplace, staircase, altar, etc.) | 20 | |
| Gold leaf | 130K | Fancy decoration for higher level items. | 300 | |
| Marble block | 325K | Expensive, durable construction (level 60+) such as throne, fireplace, opulent table, staircase, dungeon entrance, altar, fountain, etc. | 500 | |
| Magic building stone | 975K | Elaborate upscale construction for highest levels. | 1000 | |
Return to People
Garden Supplier
The Garden Supplier is located in Falador Park, east of the Tree patch. She sells bagged plants, flowers, trees and hedges that can be put in your Garden or Formal Garden. The prices range from 1K to 100K coins. All bagged plants look identical. Each plant level (1, 2 or 3) can be placed in each plant space (Small plant 1, 2, Big plant 1, 2). The resulting plant will be different for each combination of plant number and location number. Remember to bring your Watering Can when you want to plant. You also get some Farming experience for each planting.
| Bagged Plant, Tree or Flower |
| Garden Construction Table (levels 1-75) |
| Formal Garden Construction Table (levels 55-81) |
Return to People
Taxidermist
The Taxidermist is located in Canifis, north-west of the tavern. If you slay a beast and find its' head (or hand in one case), you can bring it to her and have it stuffed for a fee. She also stuffs Bass, Swordfish and Shark, but these are specially-named items that you fish up - the normal ones won't do. Mount the stuffed items in your Skill hall to display your trophies. Note that when you remove the trophy display, the trophy item is *not* recoverable. This is also true if you remove your Skill hall - your trophies are gone forever. Players report killing or fishing hundreds of creatures before getting a trophy item, so keep this rarity in mind. Trophy items are not tradeable.
| Taxidermy | ||
| Beast | Level to mount |
Fee (gp) |
| Bass | 36 | 1K |
| Crawling Hand | 38 | 1K |
| Cockatrice | 38 | 2K |
| Basilisk | 38 | 4K |
| Swordfish | 56 | 2.5K |
| Kurask | 58 | 6K |
| Abyssal Demon | 58 | 12K |
| Shark | 76 | 5K |
| King Black Dragon | 78 | 50K |
| Kalphite Queen | 78 | 50K |
Return to People
Herald
The Herald Sir Renitee is located in Falador, in the White Knights' Castle. He is upstairs on the east side, sitting in a chair at a desk. He assigns family crests at random. Your first crest assignment (must have at least level 16 Construction) is free. If you do not like your assigned family crest, he will change it for a fee of 5K, but you may also need to bring a specific item or meet certain qualifications (listed in the table below) to be allowed to get your desired crest.
Your family crest can be used on various decorations around your house (Dining Room, Skill Hall and Throne Room), and applied to armour and banners at certain Heraldry stations in a Workshop, depending upon your crafting skill level (at least 38). Only steel or rune full helms and kiteshields can accept crest colours. The final armour appearance will be identical on steel or rune. Note that applying family crest colours to armour is not reversible nor removable at this time (they also cannot be re-painted). Also, if you change your crest, the items you have already decorated will retain your old crest.
The table below shows the appearance of each crest on a full helm, a kiteshield, a banner, and on the crested decorations in your home.
| Crest Change Requirements | ||
| Crest | Requirement | Appearance |
| Arrav | Shield of Arrav quest | |
| Asgarnia | None | |
| Dorgeshuun | Lost Tribe quest | |
| Dragon | Dragon Slayer quest | |
| Fairy | Lost City quest | |
| Guthix | 70+ Prayer | |
| H.A.M. | None | |
| Horse | Toy horse in inventory | |
| Jogre | None | |
| Kandarin | None | |
| Misthalin | None | |
| Money | Costs 500,000 coins | |
| Saradomin | 70+ Prayer | |
| Skull | Skulled while talking to Herald | |
| Varrock | None | |
| Zamorak | 70+ Prayer | |
As a sideline, he sells portraits, landscapes and maps, which can be used to decorate your Quest Hall. Available portraits and landscapes are based upon your quest adventures.
| Herald Fee Schedule | |
| Item | Fee |
| Map (Small, Medium or Large) | 1K |
| Portrait (King Arthur, Elena, King of Keldagrim, Prince and Princess of Miscellania) | 1K |
| Landscape (River Lum, Kharid desert, Morytania, Karamja, Isafdar) | 2K |
| First Crest Assignment | Free |
| Change Crest | 5K |
Return to People
Return to Top
Servants
When you achieve Construction level 20 and have two bedrooms (each with a bed), you can hire a low-level servant. The Servants' Guild is located in East Ardougne, north of the market square. To hire a servant, simply talk to them and pay them. Though still standing there, they will be at your house. The Master Servant explains what tasks the servants can perform. All of the servants will greet your guests, serve some food, and take items to and from the bank, but the higher level servants can finish bank runs faster. When asking servants to withdraw items from the bank you will be asked to enter your bankpin if you haven't already done so since you logged in. Higher level servants can also carry more items for you. Some servants can also take wood to the sawmill and get planks.
Servants will take the payment from your bank if they need paying.
Your servant will also follow you around unless you tell them not to, You can fire your servant if you like. You may only have one servant at a time.
The last errand can be repeated by right clicking "fetch from bank".
| Servants | |||||||
| Servant | Level to Hire | Cost | Food Served | Carry Limit | Cost per Item | Time(sec) | Other tasks |
| Rick |
20 | 500 *375 |
Shrimp | 6 | 10.4 | 60 | n/a |
| Maid |
25 | 1000 *750 |
Stew and Cups of tea | 10 | 12.5 | 30 | n/a |
| Cook |
30 | 3000 *2250 |
Pineapple pizzas | 16 | 23.4 | 20 | Wood to Planks |
| Butler |
40 | 5000 *3750 |
Chocolate cakes | 20 | 31.3 | 10 | Wood to Planks |
| Demon Butler (Alathazdrar) |
50 | 10,000 *7500 |
Curry | 26 | 48.1 | 5 | Wood to Planks |
* Indicates the price after completing Love Story
Return to Top
House Options Interface
Several house-related options are available to you through your Options menu. To access these options, click on the house icon from your Options menu. This will bring you to the House Options menu (shown below). From this menu, you are able to customize several options concerning your house.
Building Mode On/Off: Toggles Building Mode On and Off. Building mode must be turned on in order to build/destroy objects and furniture in your house. Please note that other players are unable to enter your house when building mode is set to On. Turning building mode to On will cause you to lose any items you may have dropped on the ground previously. A message will pop up reminding you that you will lose these items if you switch to On. You are unable to drop any items while building mode is set to On. For players who have a bank PIN set, you will be prompted to enter your PIN number when attempting to turn on building mode.
When teleporting, arrive In house/At portal: Toggles the spot you arrive at after teleporting to your house (Teleport to House spell or tablet). If "At Portal" is selected you will arrive at the entrance Portal outside of your house. If "In House" is selected you will arrive at the exit portal inside your house. Please note: if you have "In House" selected, you will arrive in your house in whatever mode (either Building or Normal) your Building Mode option (above) is set to.
Expel Guests: By clicking this button, you will instantly expel (kick out) any other player who is in your house. They will arrive beside the entrance portal just outside of your house.
Leave House: By clicking this button you will instantly exit your house and arrive at the entrance portal just outside of it.
Number of rooms: This number lets you know how many rooms you currently have built in your house.
Return to Top
Agility Shortcuts
Many shortcuts require players to bring a crossbow and grapple or a rope every time they want to use them, but with a few materials and a high enough construction level, you can build hidey-holes and rope racks to hold these items right at the shortcut! Each shortcut requires a saw and hammer, as well as other varying items and construction levels. Visit these pages for more information on the crossbow shortcuts and eagle transportation system.
| Hidey-Holes | |||
| Location | Construction level required | Materials required | Experience gained |
| Falador wall | 29 | 4 Planks, Bronze crossbow, Mithril grapple, 4 Nails | 408 |
| Yanille wall | 31 | 4 Planks, Bronze crossbow, Mithril grapple, 4 Nails | 528 |
| Catherby cliff | 45 | 4 Oak planks, Iron crossbow, Mithril grapple | 984 |
| River Lum | 47 | 4 Oak planks, Steel crossbow, Mithril grapple | 1,044 |
| Water Obelisk | 49 | 4 Teak planks, Mithril crossbow, Mithril grapple | 1,464 |
| Musa Point | 52 | 4 Mahogany planks, Mithril crossbow, Mithril grapple | 1,872 |
| Prifddinas Waterfall | 75 | 4 Mahogany planks, Rune crossbow, Mithril grapple | 2,059 |
| Rope Racks | |||
| Location | Construction level required | Materials required | Experience gained |
| Eagle's Peak eyrie | 18 | 3 Planks, 5 Ropes, 4 Nails | 252 |
| Baxtorian Falls house | 24 | 3 Oak planks, 5 Ropes | 540 |
| Karamja eyrie | 28 | 3 Oak planks, 5 Ropes | 540 |
| Feldip eyrie | 38 | 3 Teak planks, 5 Ropes | 810 |
Return to Top
Tips and Tricks
General
Level Boosting
Constructor's Outfit & God Chisels
Repairs in the Workshop
Guest Access
Additional Experience
Request Assistance
Construction Cape
General
Some items you build will provide endless supplies of minor items you can use in your house. For example, your first wooden larder (level 9) supplies milk and tea (leaves). Your first wooden shelves (level 12) supply cups, kettles, and teapots.
Some of the supply items cannot be taken out of the house (they disappear out of your inventory), such as tea, beer from your barrel, and beer glasses. (Note that beer from your barrel cannot be used to rebuild the barrel.) However, the workshop tools and bookcase quest books can be taken outside.
Some construction items such as planks, nails, and flatpacked items can be obtained from treasure trail clues. Refer to our Treasure Trail Guide to learn more about obtaining and solving clue scrolls.
When removing and rebuilding items for training purposes, keep in mind that the removed item is destroyed and you normally get nothing back. This includes those hard-to-find monster and fish trophies. Very few items are *recovered*: only armour displays in a skill hall, and sword and guild displays (Amulet of glory, legends cape, antifire shield) in a quest hall. You are forced to withdraw all your costumes before you can remove your costume room, but it is reported that if you remove an entire Skill hall or Quest hall, you lose *everything* in it!
Building and removing oak larders (8 oak planks) is considered the fastest way to level up. At level 74, players can build oak doors (10 oak planks) instead. Making flatpacks at the workshop bench is another good method.
Flatpacks can be dropped, given to other players or sold in stores - there is no player market except for the very highest level items. Items that can be flatpacked are limited to only the most traditional types of furniture, plus ale barrels. The list of flatpack-able items by hotspot name includes barrels, beds, bookcases, chairs, clocks, dressers, seating (dining room), tables, and wardrobes. Additionally, all costume room items can be flatpacked. If you need a furniture item and do not have the required skill level, consider asking a higher level friend to make it for you.
In addition, players who have completed the Hard Fremennik Tasks can sell their unnoted flatpacks to Advisor Ghrim in Miscellania.
It is not possible to enter Building Mode if you are being followed by a pet or summoning familiar, and Teleport to House will disable building mode in these situations. Carried pets and summoning pouches are allowed, but may not be used while in building mode.
Using a Sacred clay hammer will help you save some money, as it will give you double experience points, with a maximum of 25,375 xp per hammer.
An alternative way to gain Construction is doing the Livid Farm minigame, where you get 54.6 experience points by repairing fence posts.
Return to Tips and Tricks
Construction level boosting
You can make tea that raises your Construction 1-3 levels temporarily. You will need a larder, shelves, a sink (such as level 7 pump and drain), and a stove (at least a level 11 firepit with hook). Fill the kettle with water and put it on the fire to boil. Put the tea leaves in the teapot. When you see the message that the kettle has boiled, take it off the stove. Pour boiling water from the kettle into the teapot (makes four servings). Pour it into cups. Add milk if desired. Different levels of shelves offer different types of teapots and cups. The better the shelf, the higher the skill boost. See the table below.
| Tea Sets | |||
| Name | Item | Source | Construction boost |
| Cup | Wooden shelves 1, Wooden shelves 2, Oak shelves 1 |
+1 | |
| Porcelain cup | Wooden shelves 3, Oak shelves 2, Teak shelves 1 |
+2 | |
| Porcelain cup (gold trimmed) | Teak shelves 2 | +3 | |
In the Evil Dave Recipe for Disaster subquest, players learn how to make a special stat-boosting stew. Jagex states that the orange spice is related to Construction (among other skills). Unfortunately, the stew's stat boosts are random, and might even reduce your stats (-6 to +6). Check Tip.It's Cooking Guide for known details.
A reward from completing the Eyes of Glouphrie quest is the Crystal saw. When carried, it (invisibly) increases your construction level by 3. This boosted level does not apply to rooms, garden plants, dungeon monsters or anything that does not require a saw (things you buy). Using it with construction tea (described above, with a skill bonus of 1 to 3), it can raise your level by up to 6. It can also be used in combination with Evil Dave's stew, with a random outcome of -3 to +9.
The god chisels also grant an invisible boost of one level in addition to an XP bonus of 1% when worn. You can earn one by building the same God Statue four months in a row.
Return to Tips and Tricks
Constructor's Outfit & God Chisels
Along with the level boosting items above, RuneScape also has its own Constructor's outfit! This outfit consists of five pieces: boots, gloves, hat, legs and shirt. The full set is untradeable and can be stored in the costume room of your player owned house.
Each piece of this outfit, gained from playing the Temple Trekking minigame, gives an experience bonus when worn. Each piece gives a 1% bonus and the whole set provides a 5% bonus. In addition to this outfit, a God Chisel will also give a 1% bonus, for a maximum of 6% when using everything.
| Constructor's Outfit & God Chisels | ||
| Item | Name | % Boost |
| Constructor's boots | 1% | |
| Constructor's garb | 1% | |
| Constructor's gloves | 1% | |
| Constructor's hat | 1% | |
| Constructor's trousers | 1% | |
| God Chisels | 1% | |
Return to Tips and Tricks
Repairs in the Workshop
Formerly useless items found around Runescape can now be repaired at your workshop repair station (or at the home of a friend!) Some minor skill experience is earned for each successful repair. Failing earns no experience. Repairing a broken arrow on a level 15 repair bench earns 8 Fletching XP and may yield a headless/bronze/iron/steel/mithril arrow. Repairing a broken staff earns 14 Crafting XP and may yield a plain staff or a staff of air/earth/fire/water. A user reports that a broken staff of Iban cannot be repaired here.
Repairing (sharpening) a rusty sword on a level 35 whetstone earns 25 Smithing XP and may yield a bronze/iron/steel/mithril sword or longsword (possibly black as well). Repairing damaged armour on a level 55 armour stand earns 25 Smithing XP and may yield a bronze/iron/steel/mithril platebody. Repairing "broken" armour may yield bronze/iron/steel/mithril platelegs. Repairing barrows armour yourself still costs money, but it's discounted depending on your smithing skill level. The percentage discount is half of your smithing level, so a level 50 Smither will receive 25% discount, and 99 smithers pay nearly half price! It earns 25 Smithing XP per item repaired as well.
Repairable "junk" items used to be found at random all over RuneScape, but Jagex has recently removed them from crates and sacks. Some locations remain: the H.A.M. cave, digging at the Digsite, picklocking/unlocking Zogre coffins, and Trawler fishing. There are also some broken arrow spawns at the Ranger's guild.
Return to Tips and Tricks
Guest Access
Admission to your house is governed in part by your Private Chat status. You can open your house to all players ("On") or limit it to your friends list ("Friends"). However, if you don't want guests but still want to use private chat, you can right click your exit portal and select "lock" to ensure your privacy. Guests are not admitted when you are in Building mode. According to Jagex, no one can enter your house when you are not at home.
To visit a friend's home, you must be on the same world and at the same town portal they use (if your friend's house is in Yanille, you can't get there from the Rimmington portal). They cannot be in Building mode, and their privacy access must be at a setting that includes you (portal unlocked, and private chat to "on" or "friends" if you are on their friends list).
Note that whenever you visit a friends house, you will always leave the house with at least the same amount of life points as you went in with.
For example: You go into your friends house with 400 LP and leave, regardless of what you did in the house that caused your LP to drop below 400 (e.g. Dungeon fighting, Duel Ring fighting, etc.), you would leave with 400 LP. If your LP was restored to 500 LP by actions such as eating food, then you would leave with 500 LP (it is higher than the LP you started with).
Also note that any poison you are affected by is removed when you leave the house, regardless of whether you received the poison while you were inside or outside the house.
Return to Tips and Tricks
Additional Experience
Occasionally a lucky adventurer may find a long or curved bone as a drop from a monster that gives big bones. Rather than burying it for paltry prayer XP, take this unusual bone to Barlak in the underground goblin city of Dorgesh-Kaan (requires Death to the Dorgeshuun quest). He will pay 1K coins and 1.5K construction experience for a long bone, or 2K coins and 2.25K construction experience for a curved bone. Find him by leaving the goblin marketplace via the south-west corner, then travelling north along the corridor (see minimap). You must have level 30 Construction and a house to receive the experience.
Before planting a grapevine in a hops patch using the Farming skill, a frame must be constructed. This requires 60 construction, 5 normal planks, and awards 75 construction experience.
Return to Tips and Tricks
Request Assistance
If you find yourself a few levels short of making an item, or want to safely offer your skills to another player, the request assistance option will allow you to do so. Simply right click the player who has the skills that you need and request their assistance. If they accept, a pair of hands will appear in your bottom right corner, and you can build whatever they can. You keep the items, but they get the experience.
There are a few exceptions when being assisted in the Construction skill. Only flatpack items that can be made on a workbench can be made using the Request Assistance option.
Return to Tips and Tricks
Skill mastery and Beyond
Cape of Achievement
Once you have mastered the skill and reached level 99 you may want to buy a Construction cape from the Estate Agent in Varrock. If you already have another 99 skill, or obtain another one while wearing the cape (unless you have it keepsaked), it will become a Construction cape (t).
Please refer to the Achievement Capes guide for more details.
![]()
After obtaining 99 Construction it becomes possible to obtain a Designed shard randomly, which can be combined with other shards from the other artisan skills (Cooking, Crafting, Firemaking, Fletching, Smithing, Herblore, Runecrafting) to create an artisan's cape and artisan's helm. The cape has the same stats as a trimmed skill cape and the helm is purely cosmetic.
True Construction Mastery
Achieving 99 is the ultimate goal for many players, however the skill does not stop there. For players wanting to show off their dedication to a skill it is possible to obtain "True Mastery" by obtaining "120 Construction" which is 104,273,167 XP. The Construction master cape can then be purchased from the Estate agent in Varrock for 120,000 gp.
It is worth noting that beyond level 99 there is no additional content for Construction as the level increases are invisible so training the skill gets no faster. To work out your theoretical Construction level check out our XP table.
Return to Tips and Tricks
Return to Top
Credits
Original Guide by: pokemama, bambino, kwimbob and ks_jeppe
Thanks to: 2hitwonder, 2nd05013, Adamskii, Adatas, Agent F, Agent Piroko, Albosky, alkatmsu, anonimouse69, APERSON, aragornkill, Baffler, Biabf, Bliazin, bobby1167, book_of_metal, Cameron, chaosmann, chenw, cocacolabottle, Cowman_133, darkblade986, DarkKnightRider, Darvaridae, dracoman_m, Ddraiggoch06, Dragnfly, dragontotem, dw_geek, DyingSilent, famfrit007, fredcook12, Georgelemmons, Ginger_Warrior, grimhald, Guitarted7, horseguy250, Huzzah, icantcmyeye, IceBlackIce, idunedain, inferno_char, jaklumen, Jookyrulz, Juhniz, L33tdemon, Lady_Shahdie, Laikrob, LJ13, Lood333, LordBaer, Masterd99, meand1, mr42, Neko Negde, nielsdek, oddfaery2, Outsanity, Pker_Dude_Jr, pokemama, quantumkik, Rcty, Reapershand, Rednightsky, rft, Rodskaeg, Rotschreck, SaidinWoT, salamander, SerpentEye, sheep455_is_the_best, sheepdean, Sheynara, Sirenix, sjefderat, skillcaster, Siobhana, smellysocks, soma2035, spike6099, SportsGuy, steakfork, Steve2136, subbss, TheLeonardo, tryto, Umega, Utopianflame, veziv, Vhellcat, virus1987, vlad_the_old, Vulxai, Warriormonkx, wizardmag, wyvren2000, Xena Dragon, Zaaps1 and zsandmann
Last updated by: Howlin0001
Last updated on: 02-Jan-2016
Return to Top
| RuneScape 2007 |
| Find this page on the Internet Archive with a date as close to Aug 10, 2007 as possible. |

Add a Tip.It button to your web site:
© 1999 - 2026 RuneScape Tips, all rights reserved.
RuneScape® and Jagex® are trademarks of Jagex Ltd © 2000 - 2026 Andrew Gower.
Reproducing or copying any material found on this page is not allowed. Designed for IE8+, Firefox 3.5+, Safari 4+, Opera 10+, and Chrome by Mil.